Are you frustrated with your Windows 10 computer constantly running at 100% disk usage? Fear not, as we have the ultimate guide to help you fix this issue and optimize your system’s performance. Discover effective solutions to remedy the problem and regain control over your PC’s disk usage.
Disable SuperFetch to fix 100% disk usage
To fix 100% disk usage in Windows 10, you can disable SuperFetch.
First, open Task Manager by pressing Ctrl + Shift + Esc on your keyboard.
Go to the “Processes” tab and look for the column labeled “Disk.”
If you see a process that is using a lot of disk, that may be the cause of the problem.
To disable SuperFetch, open the Command Prompt by typing “command prompt” in the Windows search bar.
Right-click on the Command Prompt and select “Run as administrator.”
In the Command Prompt window, type “net.exe stop superfetch” and press Enter.
This will stop the SuperFetch service and should reduce the disk usage.
Restart your computer to see if the issue is resolved.
Update device drivers for resolving disk usage issues
To resolve disk usage issues in Windows 10, updating device drivers can often be an effective solution. Outdated or incompatible drivers can contribute to high disk usage, causing slowdowns and performance issues. Follow these steps to update your device drivers:
1. Press the logo key + R to open the Run dialog box.
2. Type “devmgmt.msc” and press Enter to open Device Manager.
3. In the Device Manager window, expand the “Disk drives” category.
4. Right-click on your hard drive and select “Update driver.”
5. Choose the option to search automatically for updated driver software.
6. Windows will then search for and install any available driver updates for your disk drive.
Updating your device drivers can help optimize disk usage and improve overall system performance. Remember to regularly check for driver updates to ensure your system is running smoothly.
Check for corrupted system files to address high disk usage
1. Press the Windows logo key and type “command prompt” in the search bar.
2. Right-click on the Command Prompt app and select “Run as administrator”.
3. In the command prompt window, type “sfc /scannow” and press Enter.
4. Wait for the scan to complete. It will check for and repair any corrupted system files.
5. Once the scan is finished, restart your computer and check if the disk usage has decreased.
This method is compatible with Windows 10, Windows 8, and Windows 7. If you have an SSD as your primary or secondary disk, this fix can help reduce disk usage and improve performance.
python

import psutil
def get_hdd_usage():
hdd_usage = psutil.disk_usage('/')
return hdd_usage.percent
def main():
hdd_percent = get_hdd_usage()
print(f"HDD usage: {hdd_percent}%")
if __name__ == '__main__':
main()
This code utilizes the `psutil` library, which provides an interface for retrieving system information such as disk usage. The `get_hdd_usage()` function uses `psutil.disk_usage(‘/’)` to fetch the disk usage details of the root directory (‘/’). It then returns the percentage of disk usage. The `main()` function calls `get_hdd_usage()` and prints the result.
Please note that this code assumes the availability of the `psutil` library and its compatibility with the operating system. Additionally, it assumes that the root directory is the appropriate location to monitor for HDD usage.
Perform a disk check to fix disk usage problems
Performing a disk check can help fix disk usage problems in Windows 10. Here’s how you can do it:
1. Open the Command Prompt as an administrator. You can do this by pressing the Windows key + X and selecting “Command Prompt (Admin)” from the menu.
2. In the Command Prompt window, type chkdsk /f and press Enter. This will initiate a disk check on your system.
3. You may be prompted to schedule the disk check for the next system restart. If so, type Y and press Enter.
4. Restart your computer to begin the disk check. The process may take some time, so be patient.
5. Once the disk check is complete, check if the disk usage problem has been resolved. You can do this by opening Task Manager (press Ctrl + Shift + Esc) and looking at the “Disk” column under the “Processes” tab.
Performing a disk check can help identify and fix any issues with your hard drive, potentially resolving the 100% disk usage problem.
Reset virtual memory to optimize disk usage
Resetting virtual memory can help optimize disk usage and resolve the issue of 100% disk usage in Windows 10. To do this, follow these steps:
1. Press the Windows key + X and select “Command Prompt (Admin)” from the menu.
2. In the command prompt window, type “SystemPropertiesAdvanced” and press Enter.
3. In the System Properties window, click on the “Settings” button under the Performance section.
4. In the Performance Options window, go to the Advanced tab and click on the “Change” button under the Virtual memory section.
5. Uncheck the “Automatically manage paging file size for all drives” option.
6. Select your system drive (usually C:) and click on the “Custom size” option.
7. Enter the initial size and maximum size values for the virtual memory. It is recommended to set both values to the same number for better performance.
8. Click on the “Set” button and then click on “OK” to save the changes.
9. Restart your computer for the changes to take effect.
By resetting the virtual memory, you can effectively reduce disk usage and improve the overall performance of your Windows 10 system.
Temporarily disable antivirus software to reduce disk usage
To temporarily disable antivirus software and reduce disk usage in Windows 10, follow these steps:
1. Open the Windows Task Manager by pressing Ctrl+Shift+Esc.
2. Click on the “More details” button if you see a simplified view.
3. Go to the “Processes” tab and look for your antivirus software in the list of running processes.
4. Right-click on the antivirus process and select “End task” or “End process”.
5. Confirm the action if prompted.
6. Open the antivirus software’s dashboard or settings and look for an option to temporarily disable the real-time protection or scanning features.
7. Disable these features and close the antivirus software.
8. Check if the disk usage has reduced by monitoring the Task Manager’s “Disk” column.
9. Remember to re-enable the antivirus software once you have finished troubleshooting or when it is necessary to protect your system.
By temporarily disabling antivirus software, you may free up disk capacity and potentially resolve the issue of high disk usage.
Fix the StorAHCI.sys driver to resolve 100% disk usage
To fix the StorAHCI.sys driver and resolve 100% disk usage in Windows 10, follow these steps:
1. Open the Windows Command Prompt as an administrator. (Press Windows key + X, then select “Command Prompt (Admin).”)
2. Type the following command and press Enter: exe -s -t 00
3. This command will reset the StorAHCI.sys driver. Wait for the process to complete.
4. Once the reset is done, restart your computer.
5. After the restart, check if the 100% disk usage issue is resolved by opening the Windows Task Manager (Ctrl + Shift + Esc) and going to the “Performance” tab. Look for the “Disk” section and see if the usage has decreased.
If this fix doesn’t work, try other solutions like disabling Windows Search, checking for malware, or updating device drivers. Remember to check your disk capacity and consider upgrading to an SSD if necessary.
Switch to ChromeOS as a solution for high disk usage
Switching to ChromeOS can be a solution for high disk usage in Windows 10. ChromeOS is a lightweight operating system that uses fewer system resources compared to Windows. By using ChromeOS, you can improve overall system performance and reduce disk usage.
To switch to ChromeOS, follow these steps:
1. Backup your important files: Transfer important files to an external storage device or cloud storage.
2. Install ChromeOS: Download the ChromeOS installation file from the official website and follow the instructions to install it on your device.
3. Transfer your files: Once ChromeOS is installed, transfer your files back to your device.
4. Explore ChromeOS: Familiarize yourself with the ChromeOS interface and its features.
5. Enjoy improved performance: With ChromeOS, you can experience a faster and more efficient system, reducing disk usage and improving overall productivity.
By switching to ChromeOS, you can optimize your disk usage and enjoy a seamless computing experience.
Identify the cause of 100% disk usage in Windows 10
Identifying the cause of 100% disk usage in Windows 10 is crucial to fixing the issue efficiently. One possible cause could be high memory usage by certain processes. To determine which processes are causing the problem, follow these steps:
1. Press Ctrl+Shift+Esc to open the Task Manager.
2. Click on the “Details” tab.
3. Look for processes with high disk usage (you can sort by the “Disk” column).
4. Identify the process(es) responsible for the high disk usage.
5. Once identified, you can take appropriate action to fix the issue.
Some common fixes include:
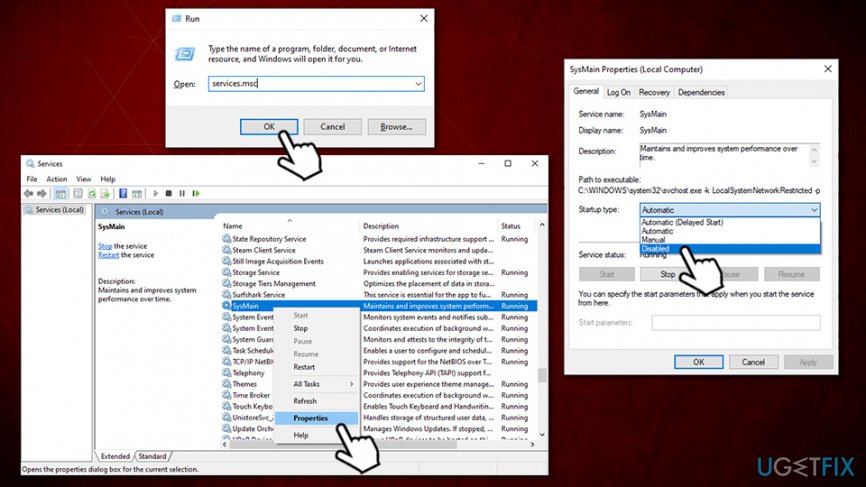
– Disabling Windows Search service: Press Win+R, type “services.msc“, locate “Windows Search” in the list, right-click and select “Properties”, change the startup type to “Disabled”, and click “OK”.
– Changing your power plan to “High performance”: Right-click on the battery icon in the taskbar, select “Power Options”, choose the “High performance” plan.
– Updating device drivers: Visit the manufacturer’s website and download the latest drivers for your hardware.
Remove viruses and malware causing high disk usage
To remove viruses and malware causing high disk usage in Windows 10, follow these steps:
1. Open the Command Prompt as an administrator by searching for “Command Prompt” in the taskbar, right-clicking it, and selecting “Run as administrator”.
2. Type “tasklist /fi “imagename eq svchost.exe” and press Enter to view a list of running processes.
3. Look for any suspicious processes or ones that are consuming a large amount of memory or disk usage. Take note of their process IDs (PID) and associated services.
4. Type “taskkill /f /pid [PID]” to end the process with the corresponding PID. Replace [PID] with the actual process ID.
5. Next, run a full system scan with Windows Defender or a reliable antivirus software to detect and remove any viruses or malware.
6. If the issue persists, consider using a third-party utility, such as Microsoft’s Malicious Software Removal Tool, to scan for and remove any remaining threats.
Close background applications to reduce disk usage
To reduce disk usage and fix the 100% disk usage issue in Windows 10, it’s important to close background applications that may be consuming excessive resources. Here’s how:
1. Press Ctrl + Shift + Esc to open the Task Manager.
2. In the Task Manager window, go to the “Processes” or “Details” tab.
3. Look for any applications or processes that are using a high amount of disk resources.
4. Right-click on the process and select “End Task” or “End Process” to close it.
5. Repeat this step for any other high-resource processes.
6. Once you have closed the unnecessary background applications, check if the disk usage has reduced.
By closing background applications that are using a significant amount of disk resources, you can free up system resources and potentially fix the 100% disk usage issue in Windows 10.
Rebuild the Windows Search index to fix disk usage issues
To fix disk usage issues in Windows 10, you can try rebuilding the Windows Search index. This can help resolve high disk usage problems and improve system performance.
To rebuild the Windows Search index, follow these steps:
1. Press the Windows key and type “Command Prompt“.
2. Right-click on “Command Prompt” and select “Run as administrator”.
3. In the Command Prompt window, type “net stop wsearch” and press Enter. This will stop the Windows Search service.
4. Next, type “del %ProgramData%\Microsoft\Search\Data\Applications\Windows\*” and press Enter. This will delete the existing search index.
5. Finally, type “net start wsearch” and press Enter to restart the Windows Search service.
After completing these steps, Windows will rebuild the search index, which may take some time depending on the size of your files. Once the process is complete, check if the disk usage issue has improved.
Remember to restart your computer after rebuilding the search index for the changes to take effect.
Repair hard disk issues to resolve high disk usage
Repairing hard disk issues can help resolve high disk usage problems in Windows 10. Here are some steps you can take to fix the issue:
1. Open the Command Prompt by typing “cmd” in the Windows search bar and selecting “Command Prompt.”
2. Once the Command Prompt window opens, type “chkdsk /f” and press Enter. This command will scan and repair any disk errors.
3. If the issue persists, you can try disabling certain services. Press the Windows key + R to open the Run dialog box, then type “services.msc” and press Enter.
4. In the Services window, look for services like “Superfetch” or “Windows Search.” Right-click on a service, select Properties, and change the startup type to “Disabled.”
5. Restart your computer and check if the disk usage has decreased.
6. If the problem still persists, you can try updating your device drivers. Right-click the Start button, select Device Manager, and expand the categories to find your devices. Right-click on a device and select “Update driver.”
Delete malfunctioning page files and temporary files to reduce disk usage
- Delete malfunctioning page files: Clear out any corrupted or malfunctioning page files that may be causing high disk usage.
- Delete temporary files: Remove temporary files that accumulate over time and may be consuming excessive disk space.
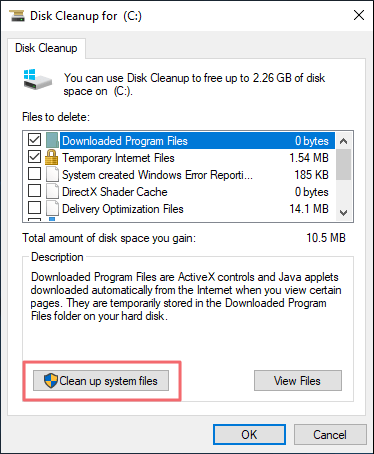
- Optimize disk usage: Take advantage of Windows 10’s built-in disk optimization tools to improve overall disk performance and reduce disk usage.
- Run Disk Cleanup utility: Utilize the Disk Cleanup utility to identify and delete unnecessary files, freeing up valuable disk space.
- Disable Superfetch service: Disable the Superfetch service, which may contribute to high disk usage in certain cases.
- Check for malware or viruses: Scan your system for any malware or viruses that could be causing abnormal disk usage and remove them accordingly.
- Update device drivers: Ensure that your device drivers are up to date, as outdated drivers can sometimes lead to high disk usage.
- Disable Windows Search service: Temporarily disable the Windows Search service to alleviate disk usage issues, especially if the search function is not critical for your needs.
- Adjust virtual memory settings: Optimize virtual memory settings to prevent excessive disk usage caused by virtual memory paging.
- Consider upgrading hardware: If all else fails, you may need to consider upgrading your hardware components to handle disk usage more efficiently.