Having trouble with the “No Internet, Secured” error on your Windows 10 WiFi? Discover effective solutions to fix this issue and regain a stable internet connection.
Understanding the “No Internet, Secured” Error on Windows 10
If you are experiencing the “No Internet, Secured” error on your Windows 10 device, there are a few troubleshooting steps you can try to fix the issue.
First, check if you have a stable internet connection on other devices. If other devices are able to connect to the internet, the problem may be specific to your Windows 10 device.
1. Restart your router and modem: Power cycle your router and modem by unplugging them from the power source, waiting for a minute, and then plugging them back in. This can sometimes resolve connectivity issues.
2. Disable and re-enable your Wi-Fi adapter: Open the Start menu, type “Device Manager,” and press Enter. Expand the “Network adapters” section, right-click on your Wi-Fi adapter, and select “Disable.” Wait for a few seconds, right-click on the adapter again, and select “Enable.” This will refresh the Wi-Fi connection.
3. Update your network adapter drivers: Outdated or faulty network adapter drivers can cause connectivity problems. Open the Start menu, type “Device Manager,” and press Enter. Expand the “Network adapters” section, right-click on your Wi-Fi adapter, and select “Update driver.” Follow the on-screen instructions to update the driver.
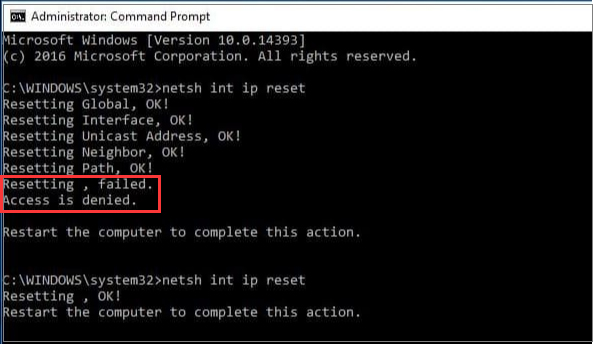
4. Reset TCP/IP stack: Open the Start menu, type “Command Prompt,” and right-click on it. Select “Run as administrator.” In the Command Prompt window, type the following commands one by one and press Enter after each:
netsh winsock reset
netsh int ip reset
Once the commands are executed, restart your computer and check if the issue is resolved.
If none of these steps fix the “No Internet, Secured” error, you may need to consult your internet service provider or consider contacting Microsoft support for further assistance.
Resetting Your Windows 10 Network Configuration
If you are experiencing the “WiFi No Internet, Secured” error on your Windows 10 computer, you may need to reset your network configuration. This can help resolve connectivity issues and restore your internet access.
To reset your Windows 10 network configuration, follow these steps:
1. Press the Windows key on your computer keyboard to open the Start menu.
2. Type “Command Prompt” into the search bar.
3. Right-click on the Command Prompt icon in the search results and select “Run as administrator” from the context menu.
4. In the Command Prompt window, type the following command and press Enter:
netsh winsock reset
5. Wait for the command to complete its execution. Once it’s done, you will see a message indicating that the Winsock catalog has been successfully reset.
6. Next, type the following command and press Enter:
ipconfig /flushdns
7. Again, wait for the command to finish executing. You will receive a message confirming that the DNS Resolver cache has been successfully flushed.
8. Close the Command Prompt window and restart your computer.
After rebooting, check if the “WiFi No Internet, Secured” error has been resolved and if you can now access the internet. If the issue persists, you may need to troubleshoot further or seek additional assistance.
Checking and Configuring Your Network Settings
If you’re experiencing the “WiFi No Internet, Secured” error on your Windows 10 device, there are a few network settings you can check and configure to resolve the issue.
First, make sure you have a stable internet connection. Check if other devices on the same network are able to access the internet. If they can, the issue may be specific to your device.
Next, ensure that your Wi-Fi is enabled. Look for the Wi-Fi icon in the taskbar and make sure it is turned on. You can also toggle the Wi-Fi switch on your laptop’s keyboard, if available.
If you’re using an Ethernet connection, ensure that the cable is securely plugged in to both your device and the router.
Once you’ve confirmed that your connection is active, you can proceed to configure your network settings.
1. Reset TCP/IP Stack
Open the Command Prompt as an administrator and type the following commands, pressing Enter after each one:
netsh winsock reset
netsh int ip reset
Restart your computer and check if the issue has been resolved.
2. Update Network Adapter Drivers
Outdated or incompatible network adapter drivers can cause connectivity issues. To update them, follow these steps:
– Press the Windows key + X and select Device Manager.
– Expand the Network adapters category.
– Right-click on your network adapter and select Update driver.
– Choose the option to search automatically for updated driver software.
– Wait for the process to complete and restart your computer.
3. Reset Network Settings
Sometimes, incorrect network configurations can lead to the “WiFi No Internet, Secured” error. To reset your network settings:
– Press the Windows key + X and select Windows PowerShell (Admin).
– Type the following command and press Enter:
netsh int ip reset
– Restart your computer and check if the issue has been resolved.
4. Disable IPv6
IPv6 is a newer version of the Internet Protocol and can sometimes cause connectivity issues. To disable it:
– Press the Windows key + X and select Network Connections.
– Right-click on your network connection and select Properties.
– Uncheck the box next to Internet Protocol Version 6 (TCP/IPv6).
– Click OK and restart your computer.
By checking and configuring these network settings, you should be able to fix the “WiFi No Internet, Secured” error on your Windows 10 device and regain internet access.
python

import subprocess
def check_wifi_status():
try:
output = subprocess.check_output(["netsh", "wlan", "show", "interfaces"])
output = output.decode("utf-8") # Convert the byte string to a regular string
if "No Internet" in output and "Secured" in output:
return True
else:
return False
except subprocess.CalledProcessError:
# Handle any errors that might occur during the command execution
return False
# Usage
if check_wifi_status():
print("Wi-Fi connected but no internet (secured)")
else:
print("Wi-Fi connection is different or has internet access")
Please note that this code relies on the `netsh` command-line tool, which is specific to Windows systems. Hence, it may not work on non-Windows platforms.
Setting a Fixed DNS Server
To set a fixed DNS server and resolve the “WiFi No Internet, Secured” error on Windows 10, follow these steps:
1. Right-click on the network icon in the taskbar and select “Open Network & Internet settings.”
2. In the Settings window, click on “Change adapter options.”
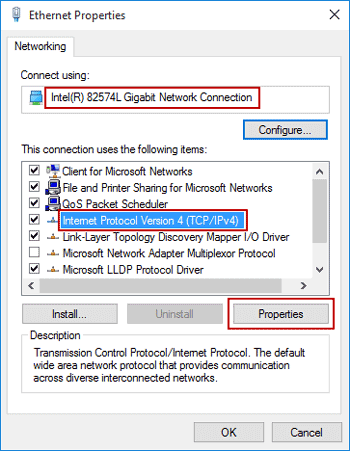
3. Right-click on your WiFi network and select “Properties.”
4. In the WiFi Properties window, scroll down and double-click on “Internet Protocol Version 4 (TCP/IPv4).”
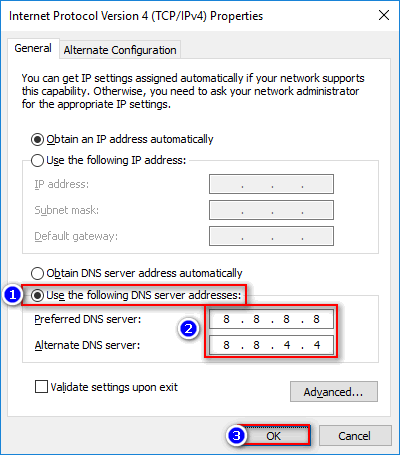
5. In the TCP/IPv4 Properties window, select the option to “Use the following DNS server addresses.”
6. Enter the preferred DNS server address in the “Preferred DNS server” field. You can use public DNS servers like Google DNS (8.8.8.8) or OpenDNS (208.67.222.222).
7. Enter the alternate DNS server address in the “Alternate DNS server” field. This is optional, but you can use another public DNS server address if desired.
8. Click “OK” to save the changes.
By setting a fixed DNS server, you can bypass any DNS issues that may be causing the “WiFi No Internet, Secured” error on your Windows 10 device. This ensures a stable and reliable connection to the internet.
Disabling 5Ghz to Resolve the Error
To resolve the “No Internet, Secured” error on your Windows 10 WiFi, you can try disabling the 5GHz frequency. Here’s how:
1. Open the Start menu and search for “Device Manager.”
2. Click on the “Device Manager” app that appears in the search results.
3. In the Device Manager window, expand the “Network adapters” category.
4. Right-click on your wireless network adapter and select “Properties” from the context menu.
5. In the Properties window, go to the “Advanced” tab.
6. Look for an option related to the 5GHz frequency. It may be called “Preferred band,” “Band preference,” or something similar.
7. Select the option that corresponds to the 2.4GHz frequency or “Auto” if available.
8. Click “OK” to save the changes and close the Properties window.
9. Restart your computer to apply the changes.
By disabling the 5GHz frequency, you are forcing your computer to connect to the 2.4GHz frequency, which may help resolve the “No Internet, Secured” error. Try connecting to your WiFi network again and see if the issue is resolved.
If you still experience the same problem, it’s recommended to troubleshoot your WiFi connection further or seek additional assistance.
Reinstalling and Updating Your Network Adapter
If you’re experiencing the frustrating “WiFi No Internet, Secured” error on your Windows 10 device, reinstalling and updating your network adapter can often resolve the issue. Follow these steps to get your WiFi connection back up and running:
1. Press the Windows key + X on your keyboard and select “Device Manager” from the menu that appears.
2. In the Device Manager window, locate and expand the “Network Adapters” category.
3. Right-click on your network adapter (it may be listed as “Wireless Network Adapter” or something similar) and select “Uninstall device.” Confirm the uninstallation if prompted.
4. After uninstalling the network adapter, click on the “Action” menu at the top of the Device Manager window and select “Scan for hardware changes.” This will prompt Windows to detect and reinstall the network adapter.
5. Wait for Windows to reinstall the network adapter. You may need to restart your computer for the changes to take effect.
6. If the issue persists, you can try updating the network adapter driver. Right-click on the network adapter again and select “Update driver.”
7. Choose the option to automatically search for updated driver software. Windows will search online for the latest driver version and install it if available. If Windows doesn’t find any updates, you can also visit the manufacturer’s website (such as Netgear, TP-Link, or the manufacturer of your computer) to download and install the latest driver manually.
8. Once the driver update is complete, restart your computer and check if the “WiFi No Internet, Secured” error has been resolved.
By reinstalling and updating your network adapter, you can often fix WiFi connectivity issues on your Windows 10 device.
Disabling Wi-Fi Sharing or Hotspot Software
To disable Wi-Fi sharing or hotspot software on Windows 10 and fix the “WiFi No Internet, Secured” error, follow these steps:
1. Press the Windows key + X on your keyboard and select “Network Connections” from the menu.
2. In the Network Connections window, right-click on the Wi-Fi network that you are currently connected to and select “Properties.”
3. In the Wi-Fi Properties window, click on the “Sharing” tab.
4. Uncheck the box that says “Allow other network users to connect through this computer’s Internet connection.”
5. Click “OK” to save the changes.
6. Restart your computer to apply the changes.
By disabling Wi-Fi sharing or hotspot software, you can resolve the “WiFi No Internet, Secured” error and ensure that your Wi-Fi connection is stable and secure.
If you are still experiencing issues with your Wi-Fi connection, you can try other troubleshooting steps such as updating your network drivers, resetting your network settings, or running the Windows Network Troubleshooter.
Remember to always keep your Windows 10 operating system up to date by installing the latest Windows updates. This can help fix any known bugs or issues related to Wi-Fi connectivity.
If you require further assistance, you can reach out to the Microsoft Support team or consult the Windows 10 documentation for additional troubleshooting steps.
Addressing Windows 10 Build 2004 No Internet Access Bug
If you’re experiencing the Windows 10 Build 2004 “No Internet, Secured” error, here are some steps you can take to fix the issue.
First, try restarting your router and modem. Sometimes, a simple reboot can resolve connectivity problems.
If that doesn’t work, check your network adapter settings. Right-click on the network icon in the taskbar and select “Open Network & Internet settings.” Then, click on “Change adapter options” and right-click on your Wi-Fi or Ethernet connection. Select “Properties” and make sure the “Internet Protocol Version 4 (TCP/IPv4)” is checked.
Another option is to run the Windows Network Troubleshooter. Go to “Settings” and click on “Update & Security.” Then, select “Troubleshoot” and choose “Internet Connections.” Follow the on-screen instructions to resolve any issues.
If the problem persists, you can try resetting your TCP/IP stack. Open a Command Prompt window as an administrator and type the following commands one by one:
netsh winsock reset
netsh int ip reset
After running these commands, restart your computer and check if the issue is resolved.
If none of the above methods work, you can update your network drivers. Open Device Manager by pressing the Windows key + X and selecting “Device Manager.” Expand the “Network adapters” section, right-click on your network adapter, and select “Update driver.” Choose the option to automatically search for updated driver software.
In some cases, disabling IPv6 can fix the “No Internet, Secured” error. Open Network Connections, right-click on your network adapter, and select “Properties.” Uncheck the box next to “Internet Protocol Version 6 (TCP/IPv6)” and click “OK.” Restart your computer to apply the changes.
If all else fails, you can try resetting your Windows network settings. Open a Command Prompt window as an administrator and type the following command:
netsh int ip reset reset.log
Restart your computer and check if the issue is resolved.
Remember, it’s always a good idea to keep your Windows 10 up to date by installing the latest Windows updates. These updates often include bug fixes and patches that can resolve various issues, including network connectivity problems.
We hope these steps help you address the “No Internet, Secured” error on your Windows 10 Build 2004. If you continue to experience issues, consider reaching out to Microsoft Support for further assistance.
Removing or Disabling Internet Security Software
To remove or disable internet security software on your Windows 10 device, follow these steps:
1. Click on the Start menu and search for “Control Panel.”
2. In the Control Panel window, select “Programs” or “Programs and Features.”
3. Locate the internet security software that you want to remove or disable from the list of installed programs.
4. Right-click on the software and select “Uninstall” or “Disable.” Follow the on-screen instructions to complete the process.
5. Restart your computer to apply the changes.
Note: It is important to have internet security software installed on your device to protect it from online threats. If you choose to remove or disable the software, make sure to find an alternative solution to ensure the security of your computer.
If you continue to experience the “No Internet, Secured” error on your Windows 10 device, try the following troubleshooting steps:
1. Restart your router and modem by unplugging them from the power source, waiting for a few seconds, and then plugging them back in.
2. Check if other devices can connect to the Wi-Fi network. If they can, the issue may be specific to your device.
3. Run the Windows Network Troubleshooter by right-clicking on the network icon in the taskbar and selecting “Troubleshoot problems.”
4. Update your network drivers by visiting the manufacturer’s website and downloading the latest drivers for your network adapter.
5. Disable any VPN or proxy settings that may be interfering with your internet connection.
6. Reset your network settings by opening the Command Prompt as an administrator and typing the following commands:
netsh winsock reset
netsh int ip reset
7. Check for Windows updates by going to Settings > Update & Security > Windows Update and clicking on “Check for updates.”
8. If none of the above solutions work, consider contacting your internet service provider for further assistance.
Optimizing Power Plan Settings
To optimize power plan settings for your Windows 10 device and fix the “WiFi No Internet, Secured” error, follow these steps:
1. Open the Power Options menu by right-clicking on the battery icon in the system tray and selecting “Power Options” from the menu.
2. In the Power Options window, select the power plan that is currently active. It is usually set to “Balanced” by default.
3. Click on “Change plan settings” next to the active power plan.
4. On the next screen, click on “Change advanced power settings.”
5. In the Advanced settings tab, scroll down to the “Wireless Adapter Settings” option and expand it.
6. Expand “Power Saving Mode” and set both “On battery” and “Plugged in” options to “Maximum Performance.”
7. Expand “Sleep” and set both “On battery” and “Plugged in” options to “Never.”
8. Click on “Apply” and then “OK” to save the changes.
9. Restart your computer for the changes to take effect.
By optimizing the power plan settings, you ensure that your wireless adapter is always running at maximum performance and not being put to sleep, which can cause connectivity issues.
If the issue persists, you can also try the following additional troubleshooting steps:
– Update your wireless adapter driver: Go to the manufacturer’s website or use Windows Update to check for the latest driver updates for your wireless adapter. Install any available updates.
– Reset TCP/IP stack: Open a command prompt with admin privileges, and then type the following commands one by one, pressing Enter after each:
netsh winsock reset
netsh int ip reset
Restart your computer after executing the commands.
– Disable IPv6: Right-click on the network icon in the system tray, select “Open Network & Internet settings,” and then click on “Change adapter options.” Right-click on your wireless adapter and select “Properties.” Uncheck the box next to “Internet Protocol Version 6 (TCP/IPv6)” and click “OK.”
These steps should help you resolve the “WiFi No Internet, Secured” error and restore your internet connectivity.
Troubleshooting and FAQ for the “No Internet, Secured” Error
-
Restart your computer and network devices:
- Turn off your computer and router.
- Wait for a few minutes.

- Turn on your router and wait for it to establish a connection.
- Turn on your computer and check if the issue persists.
-
Update your network adapter driver:
- Press Windows Key + X and select Device Manager.
- Expand the Network Adapters category.
- Right-click on your network adapter and select Update driver.
- Choose Search automatically for updated driver software.
- Follow the on-screen instructions to complete the update process.
-
Reset TCP/IP stack:
- Open Command Prompt as an administrator.
- Type netsh int ip reset and press Enter.
- Wait for the command to execute and then restart your computer.
-
Disable IPv6:
- Press Windows Key + X and select Network Connections.
- Right-click on your network connection and choose Properties.
- Uncheck the box next to Internet Protocol Version 6 (IPv6).
- Click OK to save the changes.
-
Change your DNS settings:
- Press Windows Key + X and select Network Connections.
- Right-click on your network connection and choose Properties.
- Select Internet Protocol Version 4 (IPv4) and click Properties.
- Select Use the following DNS server addresses.
- Enter 8.8.8.8 as the Preferred DNS server and 8.8.4.4 as the Alternate DNS server.
- Click OK to save the changes.
-
Disable your VPN or antivirus software:
- If you are using a VPN or antivirus software, temporarily disable it to check if it is causing the issue.
- Refer to the documentation of your VPN or antivirus software for instructions on how to disable it.

- Restart your computer and see if the problem is resolved.
-
Perform a network reset:
- Open Settings by pressing Windows Key + I.
- Go to Network & Internet.

- Scroll down and click on Network reset.
- Click on Reset now and follow the on-screen instructions.
- Restart your computer and check if the issue persists.