Are you experiencing a DNS server not responding error? In this article, we will discuss the common causes and solutions to fix this issue.
Understanding “DNS Server Not Responding” Issues
When encountering a “DNS Server Not Responding” error, the first step is to troubleshoot the issue by identifying the common causes and potential solutions. One of the most common causes of this error is a problem with the DNS server settings, which can often be resolved by changing the DNS server address to a public DNS server such as Google’s public DNS or OpenDNS.
Another potential cause of the error is network connectivity issues, which can be resolved by checking the physical connections, restarting the modem or router, and ensuring that the Wi-Fi or Ethernet connection is functioning properly. In some cases, the error may be caused by corrupted cache or temporary files, which can be resolved by clearing the DNS cache on your computer.
If the issue persists, it may be necessary to reboot your computer or network devices to reset the connection and resolve any temporary glitches. Additionally, checking for software updates and scanning for malware or viruses can help address any underlying issues that may be causing the error.
Video Tutorial for Resolving DNS Errors
- Open Command Prompt by typing “cmd” in the search bar and selecting it from the results.
- Type ipconfig /flushdns and press Enter.
- Wait for the confirmation message that the DNS cache has been successfully flushed.
Change DNS Server
- Open Control Panel and go to Network and Sharing Center.
- Click on Change adapter settings and right-click on your network connection.
- Select Properties and double-click on Internet Protocol Version 4 (TCP/IPv4).
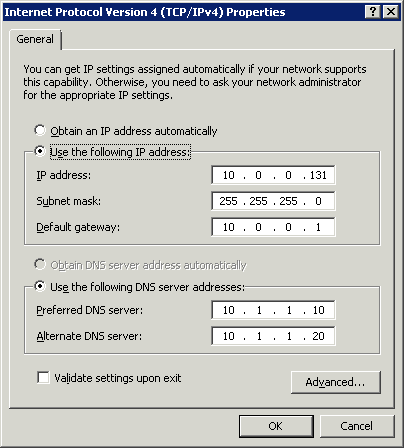
- Choose Use the following DNS server addresses and enter a preferred and alternate DNS server.
- Click OK to save the changes.
Disable Proxy Server
- Open Control Panel and go to Internet Options.
- Go to the Connections tab and click on Lan settings.
- Uncheck the box that says Use a proxy server for your LAN.
- Click OK to save the changes.
Network Troubleshooting Steps
1. Check your internet connection by opening a web browser and navigating to a website. If the page doesn’t load, the issue may be with your internet connection.
2. Restart your router and modem by unplugging them, waiting for a few minutes, and then plugging them back in.
3. Flush the DNS cache on your computer by opening the Command Prompt and typing “ipconfig /flushdns”.
4. Change your DNS server settings to a public DNS server such as Google’s (8.8.8.8 and 8.8.4.4) or OpenDNS.
5. Disable any VPN or proxy settings that may be interfering with your DNS resolution.
6. Try accessing the website in a different web browser to see if the issue is specific to one browser.
7. Check for any recent changes to your network or computer settings that may have caused the DNS server not responding error.
Trying Alternative Web Browsers
If you’re experiencing a DNS server not responding error, one potential solution is to try using an alternative web browser. Sometimes, the issue may be specific to the browser you’re using, so switching to a different one can help resolve the problem.
First, try accessing the internet using a different web browser such as Google Chrome, Safari, Microsoft Edge, or Firefox. If you’re able to connect without any issues using a different browser, then the problem may be with the original browser you were using.
It’s also a good idea to try using the alternative web browser in safe mode to rule out any potential conflicts with other programs or settings on your computer. This can help determine if the issue is related to your computer network or home network.
If you’re still experiencing the DNS server not responding error after trying different web browsers, there may be a different underlying cause that requires further troubleshooting.
Safe Mode Restart for PCs
To restart your PC in Safe Mode, follow these steps:
First, click on the “Start” menu and select the “Power” icon. Then, press and hold the “Shift” key on your keyboard and click on “Restart.”
When the “Choose an option” screen appears, select “Troubleshoot,” then “Advanced options,” and then “Startup Settings.”
Click on “Restart,” and when the computer restarts, you will see a list of options. Press the number corresponding to “Enable Safe Mode” or “Safe Mode with Networking,” depending on your needs.
Finally, your computer will restart in Safe Mode, allowing you to troubleshoot the DNS Server Not Responding error in a more secure environment.
Restarting your PC in Safe Mode can help you diagnose and fix the DNS Server Not Responding error by eliminating potential software conflicts or issues with third-party applications.
Power Cycling Modems and Routers
To fix the DNS server not responding error, one common solution is to power cycle your modem and router. This can help refresh the connection and resolve any temporary issues.
First, unplug the power cables from both your modem and router. Wait for at least 30 seconds before plugging them back in.
Once the devices have fully powered back on, check to see if the DNS server not responding error has been resolved. If not, you may need to explore other potential causes and solutions.
Power cycling your modem and router is a simple yet effective troubleshooting step that can often resolve connectivity issues. It’s a good first step to take when encountering DNS server errors.
Antivirus and Firewall Impact on Connectivity
When experiencing a DNS server not responding error, it’s important to consider the potential impact of your antivirus and firewall software on your connectivity. Firewalls and antivirus programs can sometimes block or interfere with the DNS resolution process, leading to connectivity issues. This can happen when the software mistakenly identifies legitimate DNS queries as potential threats.
To address this issue, you can temporarily disable your antivirus and firewall programs to see if the DNS server not responding error resolves. If the error goes away after disabling these programs, you may need to adjust the settings to allow DNS queries to pass through without interference.
Additionally, it’s a good idea to check for any recent updates or changes to your antivirus and firewall software that may have inadvertently affected your network connectivity. Keeping your security software up to date can help prevent these types of issues from occurring in the future.
Managing Multiple Network Connections
To manage multiple network connections on your computer, you can use the Network and Sharing Center in Windows. From there, you can view and change the settings for each connection, including Wi-Fi, Ethernet, and mobile broadband. If you’re using a Mac, you can manage network connections through the System Preferences and the Network pane.
If you’re having trouble with your DNS server not responding error, it could be due to issues with your network connections. To troubleshoot this, you can try resetting your network settings by going to the Control Panel in Windows and selecting Network and Internet then Network and Sharing Center. From there, click on Change adapter settings, right-click on your network connection, and select Disable. Then right-click again and select Enable to reset the connection.
Another solution is to flush your DNS cache. In Windows, you can do this by opening the Command Prompt as an administrator and typing ipconfig /flushdns. In macOS, you can open the Terminal and type sudo killall -HUP mDNSResponder to flush the DNS cache.
By managing your network connections and using these troubleshooting methods, you can work towards fixing the DNS server not responding error on your computer.
Modifying DNS Server Settings
To modify your DNS server settings, first, open the Control Panel on your Microsoft Windows computer. Then, click on “Network and Internet” and then “Network and Sharing Center”. Next, click on “Change adapter settings” in the left-hand menu.
Find the network connection that you want to modify, right-click on it, and select “Properties”. In the properties window, select “Internet Protocol Version 4 (TCP/IPv4)” or “Internet Protocol Version 6 (TCP/IPv6)” depending on your setup, and then click “Properties” again.
In the new window, select “Use the following DNS server addresses” and enter the preferred and alternate DNS server addresses provided by your internet service provider or a public DNS service like Google DNS (8.8.8.8 and 8.8.4.4) or OpenDNS (208.67.222.222 and 208.67.220.220).
Click “OK” and then “Close” to save the changes. You may need to restart your computer or renew your IP address for the changes to take effect.
Clearing DNS Cache and Resetting IP
To clear the DNS cache and reset the IP on your Windows computer, follow these steps:
Clearing DNS Cache:
1. Open the Command Prompt by typing “cmd” in the search bar and selecting it from the results.
2. In the Command Prompt window, type “ipconfig /flushdns” and press Enter.
3. Wait for the confirmation message that the DNS resolver cache has been cleared.
Resetting IP:
1. In the Command Prompt window, type “ipconfig /release” and press Enter to release the current IP address.
2. Then, type “ipconfig /renew” and press Enter to obtain a new IP address from the DHCP server.
These steps can help resolve DNS server not responding errors by refreshing the DNS cache and obtaining a new IP address.
Deactivating IPv6 Support
To deactivate IPv6 support, you can follow these steps on your Windows 10 operating system:
1. First, open the Control Panel by clicking on the Start menu and typing “Control Panel” in the search bar.
2. In the Control Panel, select “Network and Sharing Center” and then click on “Change adapter settings” in the left-hand menu.
3. Right-click on your network connection and select “Properties” from the drop-down menu.
4. In the properties window, uncheck the box next to “Internet Protocol Version 6 (TCP/IPv6)” and click “OK” to apply the changes.
If you are using a different operating system, the process may vary slightly, but the general steps should be similar. By deactivating IPv6 support, you may be able to resolve the DNS server not responding error and improve your internet connectivity.
Updating Network Adapter Drivers
To update network adapter drivers, first, open the Device Manager by right-clicking on the Start button and selecting Device Manager. Look for the Network adapters section and expand it. Right-click on your network adapter and select Update driver. Choose Search automatically for updated driver software and follow the on-screen instructions. If Windows doesn’t find a new driver, you can try visiting the manufacturer’s website to download and install the latest driver manually. After updating the driver, restart your computer to apply the changes.
Resolving Network Adapter Driver Issues
– If you are experiencing network adapter driver issues, the first step is to check for any driver updates.
– Open the Device Manager by right-clicking on the Start button and selecting it from the menu.
– Look for the network adapter section and right-click on your network adapter, then select “Update driver.”
– If updating the driver doesn’t solve the problem, you can try uninstalling the driver and then reinstalling it.
– Open the Device Manager again, right-click on the network adapter, and select “Uninstall device.”
– After the driver is uninstalled, restart your computer and the driver should reinstall automatically.
– If the issue persists, you may need to download the latest driver from the manufacturer’s website and install it manually.
– This should resolve any network adapter driver issues you are experiencing.
Disabling Windows Peer-to-Peer Feature
To disable the Windows Peer-to-Peer feature, follow these steps:
1. Open Control Panel on your Windows computer.
2. Click on Network and Internet and then Network and Sharing Center.
3. On the left-hand side of the window, click on Change advanced sharing settings.
4. Under the Private section, find the File and printer sharing option and turn it off.
5. Scroll down to the All Networks section and find Turn off password protected sharing. Click on it to disable this feature.
Addressing Secondary Connection Interference
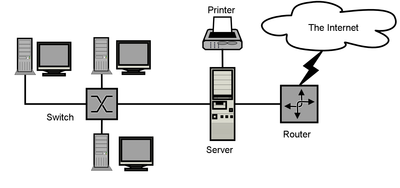
Secondary connection interference can often cause DNS server not responding errors. This can be due to issues with the network switch, network interface controller, or other devices on the network. To fix this, check the physical connections of all devices on the network to ensure they are properly plugged in and functioning.
Another common cause of secondary connection interference is interference from other wireless devices in the vicinity. Make sure to place your router in a central location and away from other electronic devices to minimize interference.
If you are still experiencing DNS server not responding errors, try restarting your router or modem to see if that resolves the issue. Sometimes a simple reboot can clear up any temporary issues.
In more advanced cases, you may need to reconfigure your network settings to address secondary connection interference. This may involve adjusting the DNS settings or other network configurations to ensure a smooth connection.
By addressing secondary connection interference, you can effectively resolve DNS server not responding errors and enjoy a stable and reliable internet connection.
Refreshing Router and Modem Connections
To refresh your router and modem connections, you can start by unplugging both devices from the power source. After that, wait for at least 30 seconds before plugging them back in. This will help to reset the connections and potentially resolve the DNS server not responding error.
Once you have plugged the router and modem back in, wait for them to fully reboot and establish a new connection. During this time, you can also restart your computer to ensure that it also establishes a fresh connection to the network.
Refreshing the router and modem connections can help to clear any temporary network issues, and it is often an effective solution for resolving DNS server not responding errors.
If the issue persists after refreshing the connections, it may be necessary to explore other potential causes and solutions for the error.
Utilizing Virtual Private Networks (VPN)
If you are experiencing a DNS server not responding error, one solution could be to utilize a Virtual Private Network (VPN). First, download and install a reliable VPN software on your device. Once installed, launch the VPN and connect to a server of your choice. This will help bypass any potential DNS issues by using a different server to access the internet.
After connecting to the VPN, try accessing the internet again to see if the DNS server not responding error has been resolved. If the issue persists, you may need to troubleshoot other potential causes such as your network settings or DNS configuration. Remember to disconnect from the VPN when not in use to avoid unnecessary traffic routing.
Utilizing a VPN can be a quick and effective solution to bypass DNS server issues and regain access to the internet.
DNS and Network Configuration FAQs
| Question | Answer |
|---|---|
| What is DNS? | DNS stands for Domain Name System. It is a hierarchical and decentralized naming system for computers, services, or other resources connected to the internet or a private network. |
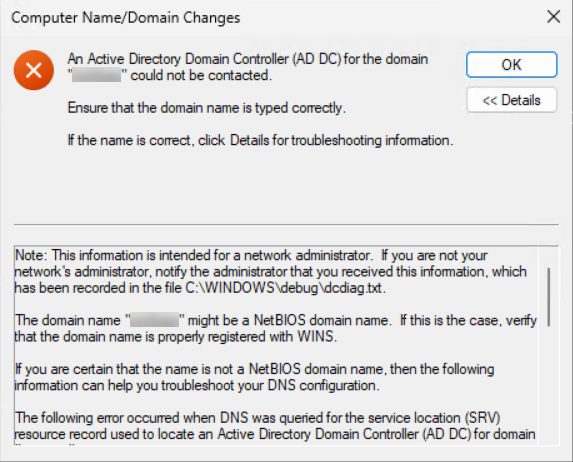
| What causes the “DNS server not responding” error? | There are several potential causes for this error, including misconfigured network settings, faulty DNS server, router issues, or internet service provider problems. |
| How do I troubleshoot DNS server issues? | First, check your network connection and restart your router. You can also try flushing the DNS cache, changing your DNS server, or resetting your TCP/IP settings. |
| What is network configuration? | Network configuration refers to the process of setting up and managing the hardware and software components of a computer network. This includes IP address assignment, DNS settings, and routing protocols. |
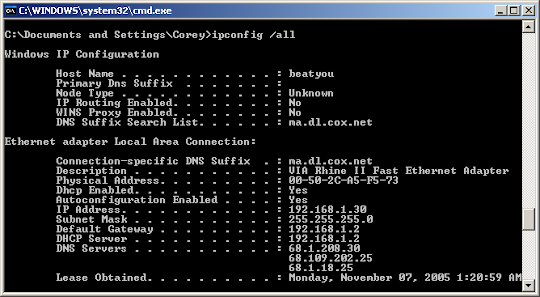
| How can I verify my DNS settings? | You can verify your DNS settings by accessing the network adapter properties on your computer and checking the DNS server addresses configured for your network connection. |
Conclusion and Best Practices
After following the common solutions to fix the DNS server not responding error, it is important to conclude with best practices to prevent future occurrences.
Firstly, regularly update your device’s operating system and network drivers to ensure they are running on the latest version. This can help resolve any compatibility issues that may arise.
Secondly, consider using a reliable and secure DNS server, such as Google DNS or OpenDNS, to enhance the stability and speed of your internet connection.
Thirdly, clear the DNS cache on your device to remove any outdated or corrupted information that may be causing the error. This can be done through the command prompt or terminal.
Finally, if you continue to experience the DNS server not responding error, consider reaching out to technical support for further assistance. They can provide more advanced troubleshooting steps tailored to your specific network setup.
By implementing these best practices, you can minimize the likelihood of encountering the DNS server not responding error in the future and ensure a smoother internet browsing experience.