Navigating through the digital realm can be an exhilarating experience, but what happens when your computer screen unexpectedly plunges into darkness? In this article, we explore nine practical fixes to combat the perplexing phenomenon of a randomly blacking computer screen. Join us as we shed light on this enigma and restore the radiance to your digital existence.
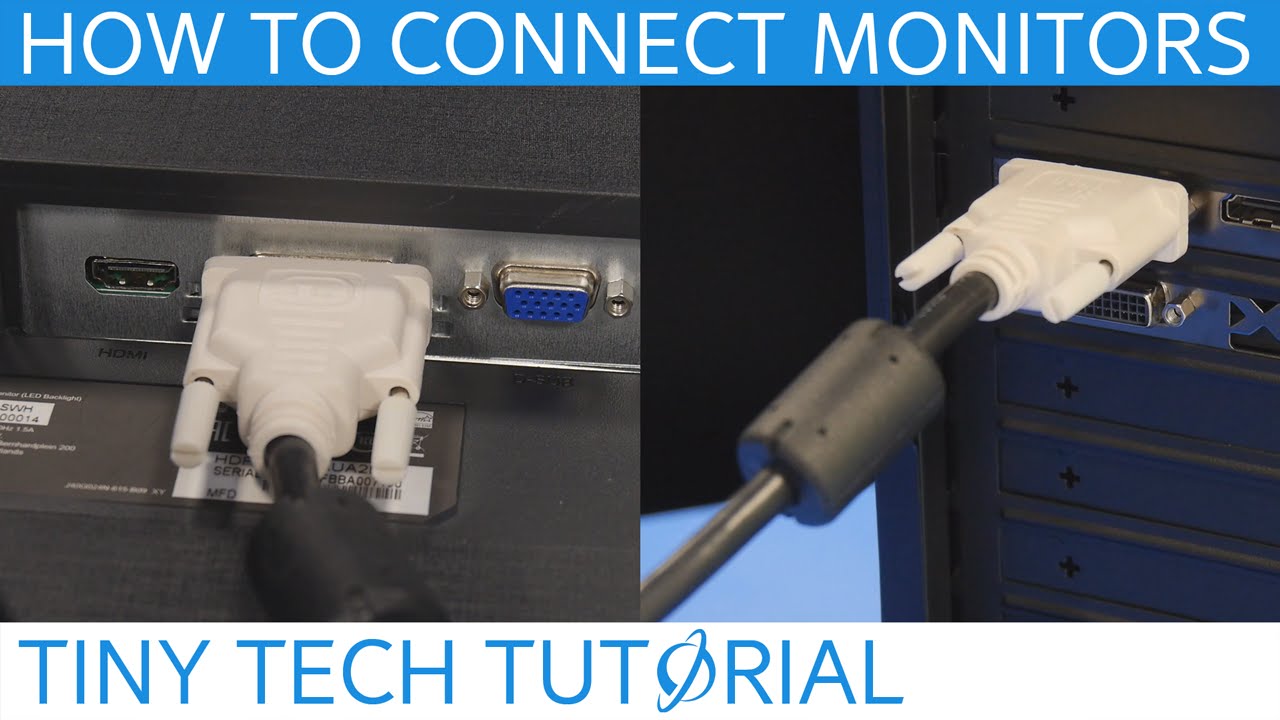
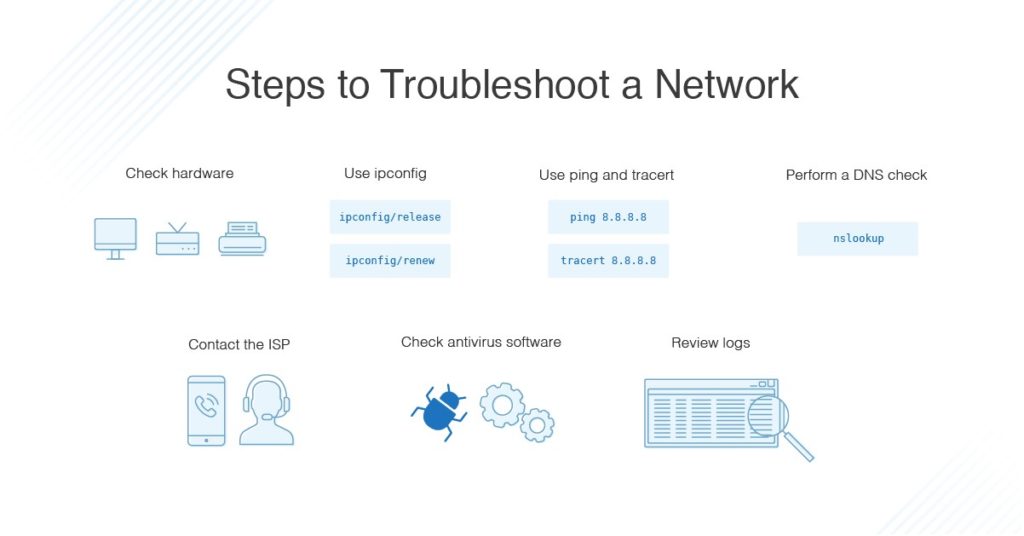
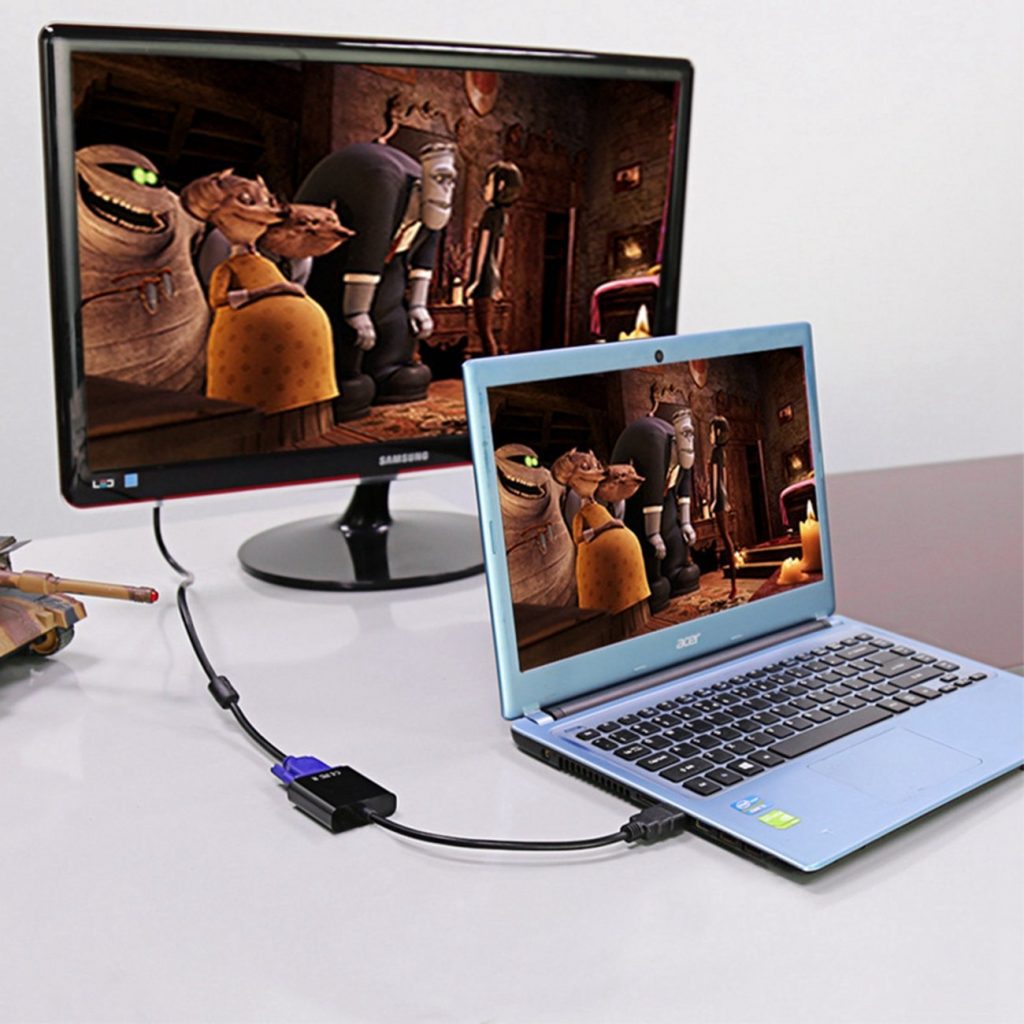
Checking video cable and ports
Checking Video Cable and Ports:
1. Ensure that the video cable is securely connected to both the computer and the monitor. A loose connection can cause intermittent blackouts.
2. If you’re using an HDMI cable, try using a different HDMI port on the monitor or computer to rule out a faulty port.
3. Check the cable itself for any visible damage or fraying. If you spot any issues, consider replacing the cable.
4. Update your graphics driver to the latest version. Outdated drivers can sometimes cause display problems. Visit the manufacturer’s website to download and install the latest driver for your GPU.
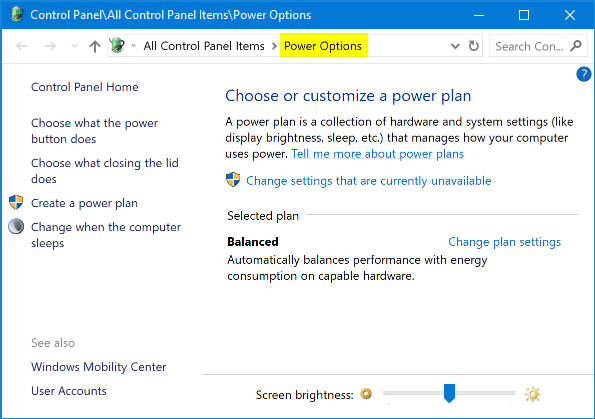
5. Adjust your computer’s power settings to prevent the screen from turning off automatically. Open the Control Panel, search for “power options,” and select the appropriate settings for your needs.
Remember, troubleshooting display issues can involve multiple factors, so it’s important to try these steps along with the other fixes mentioned in this article.
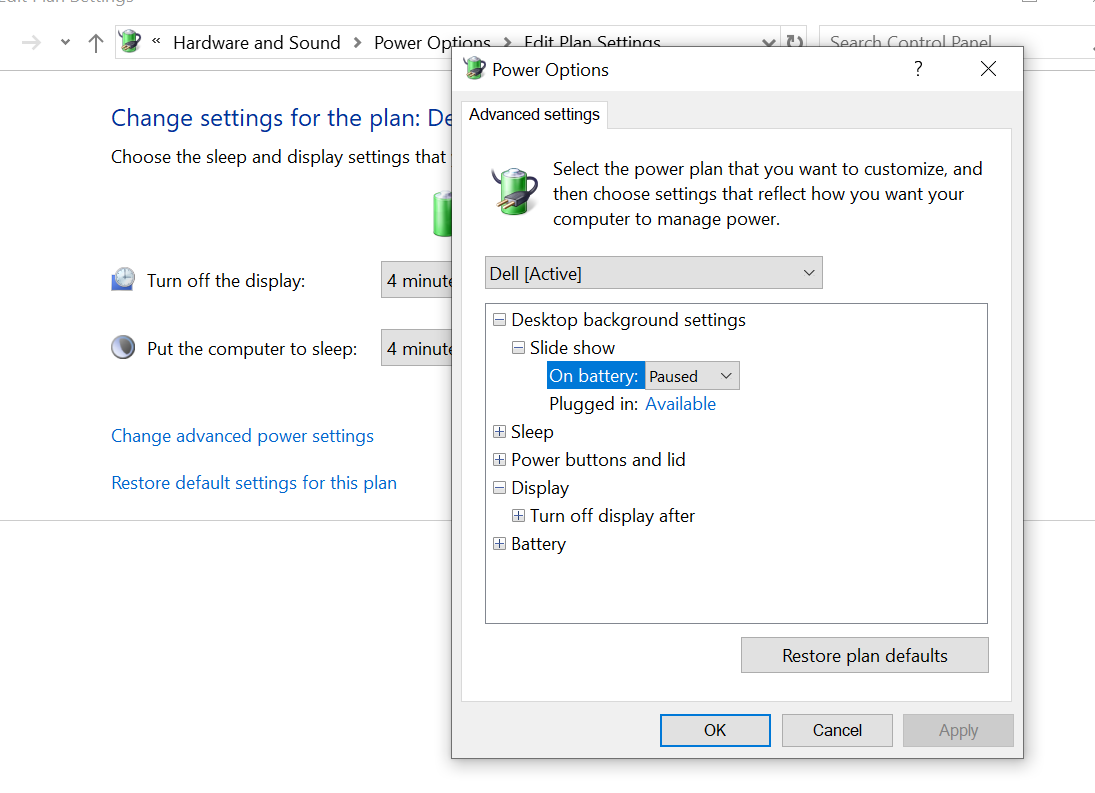
Adjusting computer power settings
Adjusting Computer Power Settings
To adjust your computer’s power settings, follow these steps:
1. Press the Windows key + X and select “Power Options” from the menu.
2. In the Power Options window, select “Change plan settings” next to your preferred power plan.
3. On the next screen, click on “Change advanced power settings.”
4. In the Advanced settings window, expand the “Display” category.
5. Expand the “Turn off display” setting and set it to a desired value, such as 30 minutes.
6. Expand the “Sleep” category and adjust the “Sleep after” setting accordingly.
7. Click “Apply” and then “OK” to save the changes.
Adjusting your computer’s power settings can help resolve issues with the screen randomly going black. By extending the time before the display turns off or the computer goes to sleep, you may prevent unexpected blackouts during your computing experience.
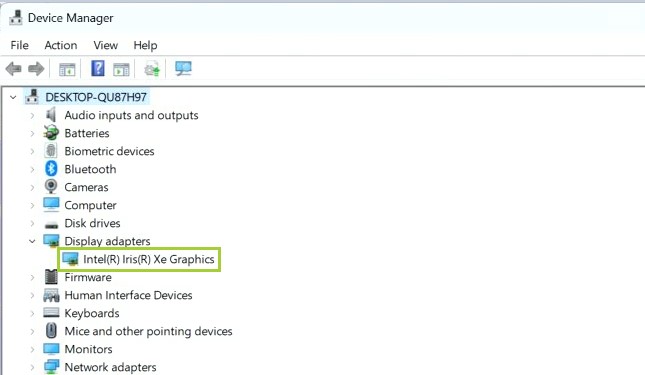
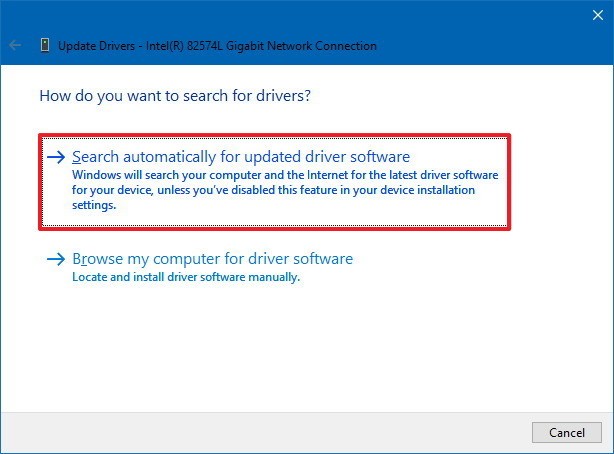
Updating graphics driver
Updating your graphics driver can help resolve issues with your computer screen randomly going black. To update your graphics driver, follow these steps:
1. Press the Windows key + X and select “Device Manager” from the menu.
2. Expand the “Display adapters” category.
3. Right-click on your graphics card and select “Update driver.”
4. Choose the option to search automatically for updated driver software.
5. If a new driver is found, follow the on-screen instructions to install it.
6. Restart your computer to apply the changes.
Updating your graphics driver can fix driver issues that may be causing your screen to go black. It’s important to keep your graphics driver up to date to ensure optimal performance and a smooth computing experience. Remember to regularly check for driver updates to avoid potential issues in the future.
python

import time
def monitor_check():
while True:
# Check if the screen is black
if is_screen_black():
# Attempt to wake up the screen
try:
wake_screen()
print("Screen woke up successfully!")
except:
print("Failed to wake up the screen.")
# Wait for a specific interval before checking again
time.sleep(5)
def is_screen_black():
# Code to determine if the screen is black
# This can involve checking for specific pixel colors or querying system APIs
def wake_screen():
# Code to wake up the screen
# This can involve sending appropriate signals or interacting with system APIs
This code is a simple example that continuously checks if the screen is black. If it detects a black screen, it tries to wake it up using the `wake_screen` function. However, please note that this code is not guaranteed to solve the issue, as the underlying cause may require specific hardware or software troubleshooting.
Factory resetting the monitor
If your computer screen randomly goes black, factory resetting your monitor can often resolve the issue.
To do this, first locate the power button on your monitor and turn it off. Unplug the power cord from the back of the monitor and wait for about 30 seconds.
While waiting, double-check that the connectors between your monitor and computer are securely connected.
Next, plug the power cord back in and turn on your monitor.
If the issue persists, you may need to factory reset the monitor. To do this, refer to the user manual or visit the manufacturer’s website for specific instructions.
Factory resetting the monitor will restore it to its default settings, which can help eliminate any software or configuration issues that may be causing the random blackouts.
Remember to also check for any driver updates for your monitor and graphics card, as outdated drivers can sometimes cause display problems.
Repairing corrupt system files
1. Run the System File Checker tool: Open the command prompt as an administrator and type “sfc /scannow“. This will scan and repair any corrupted system files.
2. Use DISM tool: Open the command prompt as an administrator and enter “dism /online /cleanup-image /restorehealth“. This will repair any damaged Windows image files.
3. Perform a clean boot: Temporarily disable startup programs to determine if any third-party software is causing conflicts. Press the Windows key + R, type “msconfig“, go to the “Services” tab, check “Hide all Microsoft services,” then click “Disable all.” Restart the computer.
4. Update drivers: Visit the manufacturer’s website for your graphics card, monitor, and other relevant drivers. Download and install the latest versions.
5. Check power settings and cables: Ensure that the power plan is not set to turn off the display. Additionally, check that all cables and connectors are secure.
Remember to restart your computer after implementing any changes. These fixes should help resolve the issue of a computer screen randomly going black.
Screen settings issues
1. Check and adjust the desktop resolution: Right-click on your desktop, select Display settings, and ensure the resolution is set correctly for your monitor.
2. Update your graphics driver: Outdated or incompatible drivers can cause screen issues. Visit your GPU manufacturer’s website or use Windows Update to install the latest driver.
3. Verify the power connection: Ensure that the power cable is securely connected to both the monitor and the power outlet.
4. Inspect the monitor’s power light: If the power light is blinking or off, it may indicate a power-related issue. Try connecting the monitor to a different power outlet.
5. Check for overheating: Overheating can cause the screen to go black. Clean your computer’s vents and ensure proper airflow.
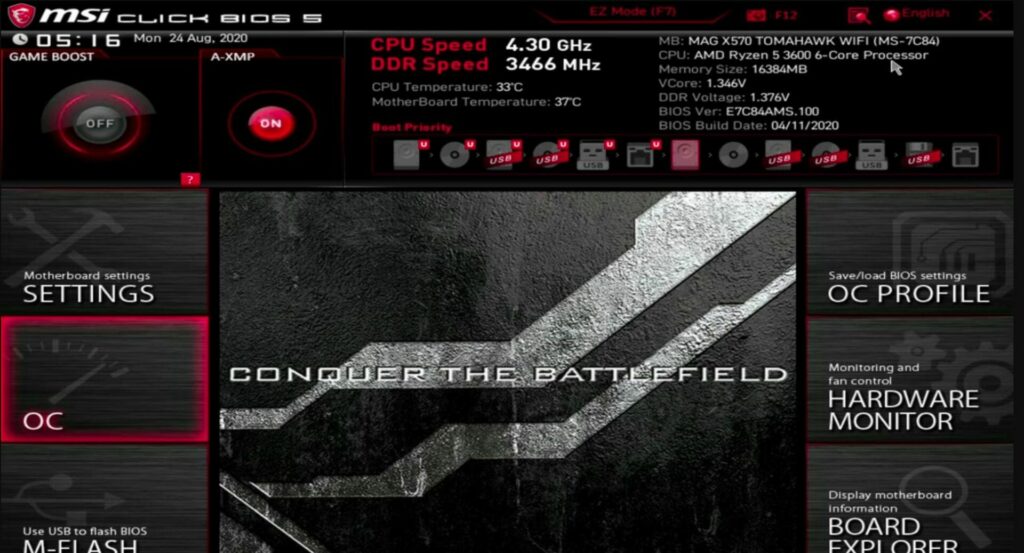
6. Disable overclocking: If you have overclocked your GPU or CPU, revert the settings to their default values as overclocking can lead to instability.
7. Scan for malware: Malware can interfere with screen settings. Run a reputable antivirus program to scan for any malicious files.
8. Reset Graphics Options: Right-click on your desktop, select Graphics Options, and choose the Reset option to restore default settings.
9. Restart your computer: Sometimes a simple restart can resolve screen issues by refreshing the operating system files.
By following these fixes, you can troubleshoot and resolve screen settings issues that cause your computer screen to randomly go black.
Resolution changes
- Make sure the power cable is securely connected to both the computer and the outlet.
- Check if the power button on the monitor is turned on.
- Inspect the video cable (VGA, DVI, HDMI, etc.) for any damage or loose connections.
- If using an external monitor, ensure it is powered on and connected properly.
- Try using a different power cable and video cable, if available, to rule out any cable-related issues.
Method 2: Adjust Power Settings
- Open the Control Panel by clicking the Start button and selecting Control Panel.
- Select Power Options.
- Choose the appropriate power plan and click on Change plan settings.
- Adjust the Turn off the display and Put the computer to sleep settings to longer durations or set them to Never.
- Click on Save changes to apply the new power settings.
Method 3: Update Graphics Driver
- Open a web browser and visit the website of your computer’s manufacturer.
- Navigate to the Support or Drivers section.
- Enter your computer’s model number and search for the latest graphics driver.
- Download the driver file and follow the on-screen instructions to install it.
- Restart your computer after the driver installation is complete.
Method 4: Disable Power Saving Features
- Right-click on the Desktop and select Display settings.
- Scroll down and click on Advanced display settings.
- Click on Change power settings.
- Choose High performance or a similar power plan that disables power-saving features.

- Save the changes and check if the black screen issue persists.
Method 5: Run Hardware Diagnostics
- Restart your computer and press the appropriate key (usually shown during startup) to enter the BIOS/UEFI menu.
- Navigate to the Diagnostics or Hardware Diagnostics section.
- Run a comprehensive diagnostic test on your computer’s hardware components.
- Take note of any error messages or failing components.
- If any issues are found, consult the manufacturer’s documentation or contact their support for further assistance.
Method 6: Check for Overheating
- Ensure your computer’s vents and fans are free from dust and debris.
- Use compressed air or a soft brush to clean out any accumulated dust.
- Monitor your computer’s temperature using software tools or the BIOS/UEFI menu.
- If temperatures are excessively high, consider improving airflow or using a cooling pad.

- Overheating can cause the screen to go black, so keeping temperatures within safe limits is crucial.
Method 7: Scan for Malware
- Open your preferred antivirus software or download a reputable one if needed.
- Update the antivirus definitions to ensure the latest malware detection capabilities.
- Perform a full system scan to check for any malware or viruses.
- If any threats are detected, follow the prompts to remove or quarantine them.
- Restart your computer and check if the black screen problem persists.
Method 8: Check for Software Conflicts
- Open the Task Manager by pressing Ctrl+Shift+Esc.
- Go to the Processes or Details tab.
- Look for any processes or applications that are consuming excessive resources.
- Right-click on the problematic process/application and select End task or End process.
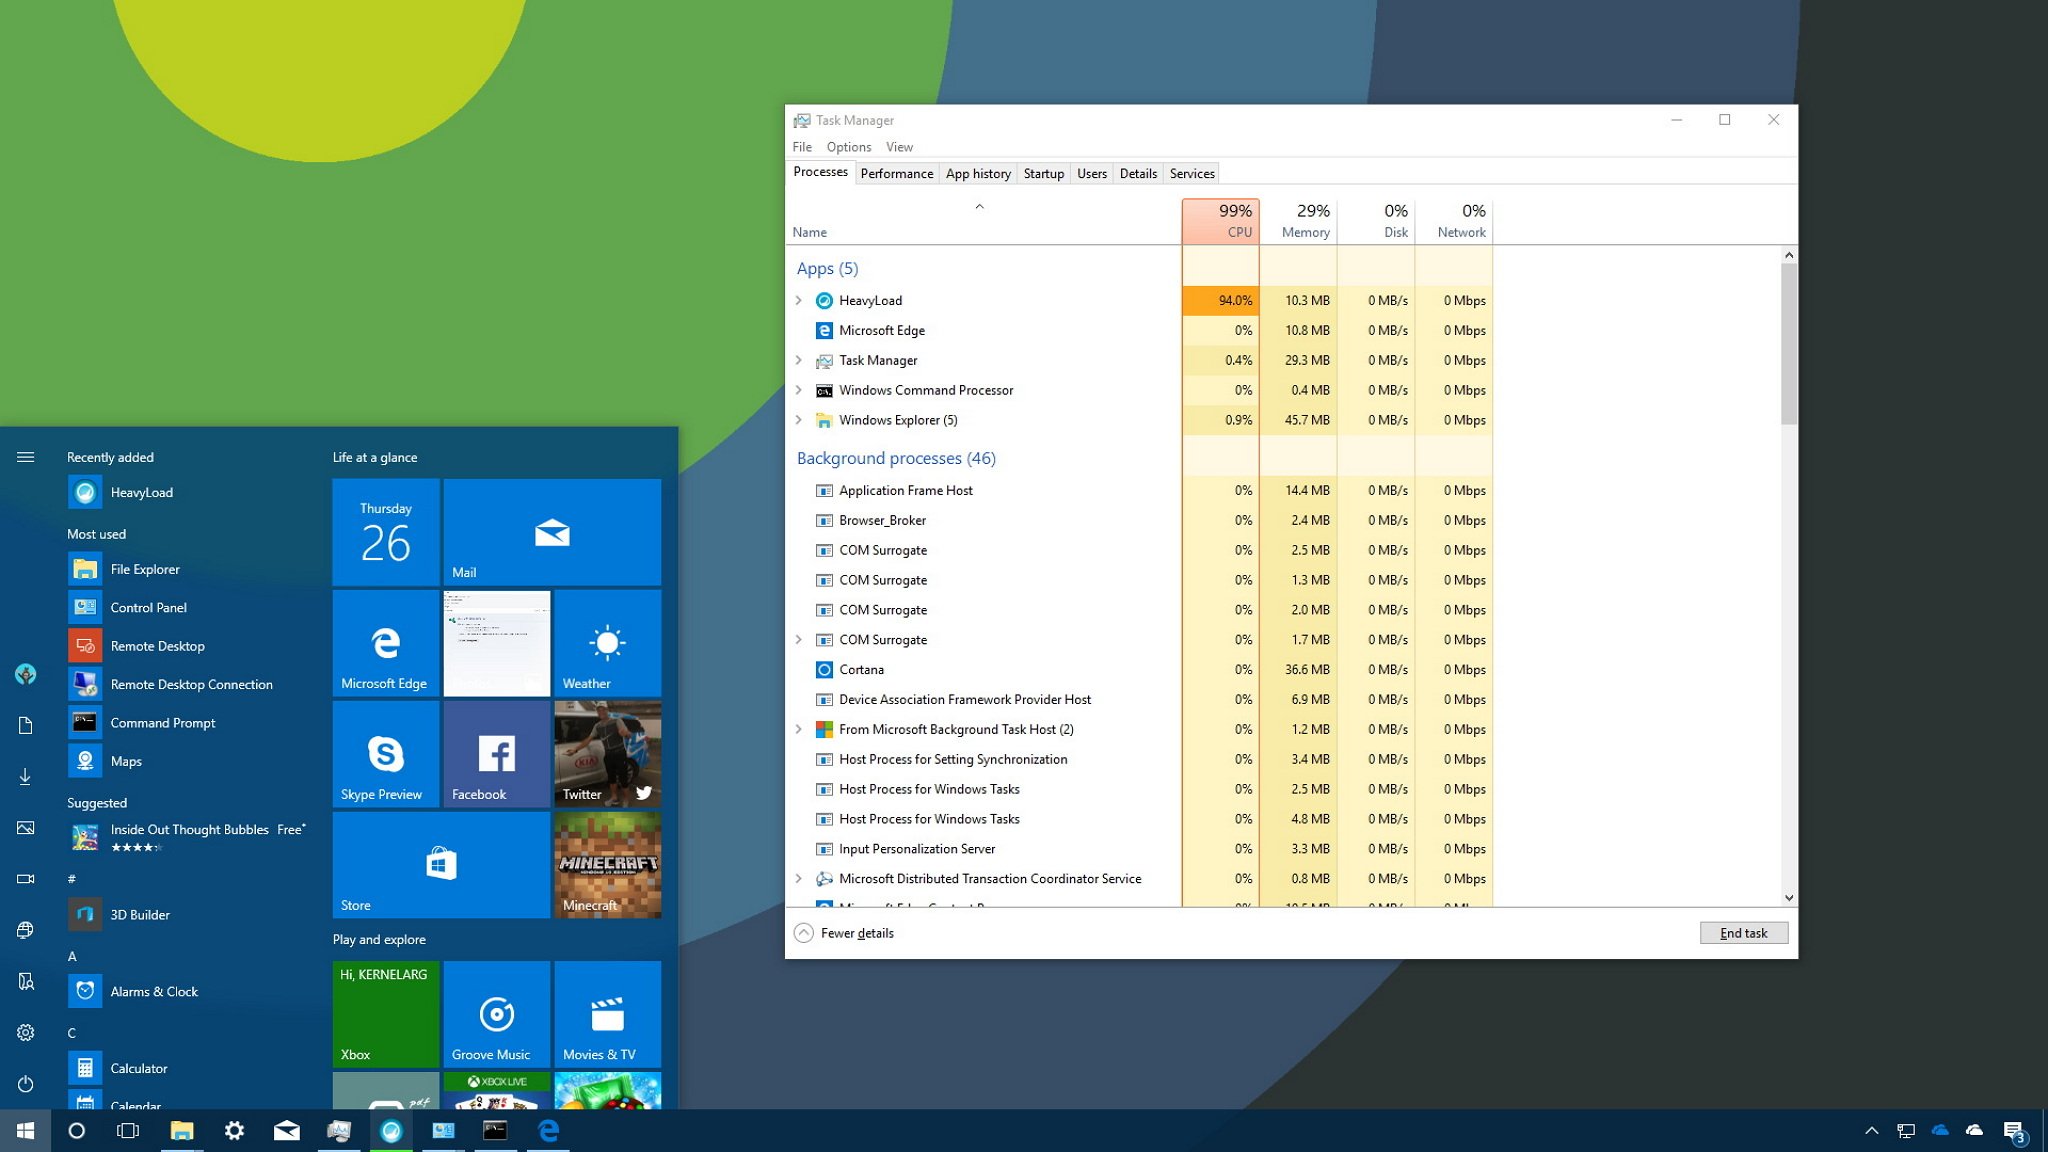
- Repeat this for any other potentially conflicting processes.
Method 9: Seek Professional Help
- If none of the above methods resolve the issue, it may be necessary to consult a professional technician.
- Explain the steps you have already taken to the technician for a more efficient diagnosis.
- They will have access to specialized tools and knowledge to troubleshoot and repair the black screen problem.
- Follow their guidance and recommendations to resolve the issue.
Graphics driver issues (Nvidia, AMD, Intel)
- Update graphics drivers
- Open the Device Manager by right-clicking on the Start button and selecting Device Manager
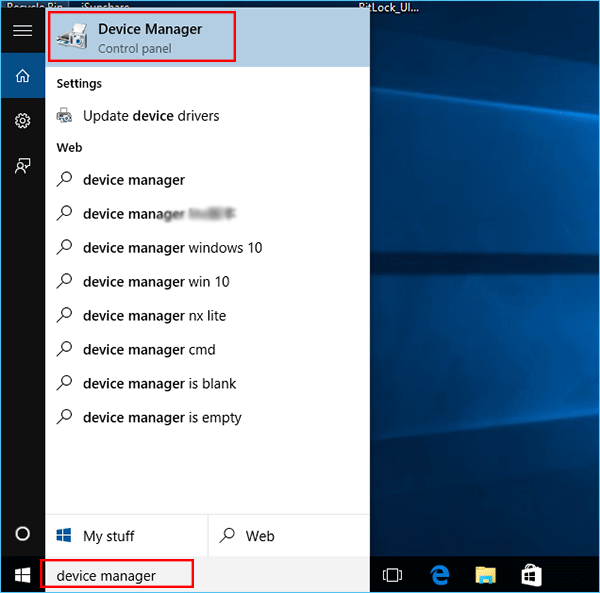
- Expand the Display adapters category
- Right-click on your graphics card and select Update driver
- Choose the option to Search automatically for updated driver software
- Follow the on-screen instructions to complete the driver update
- Roll back graphics drivers
- Open the Device Manager by right-clicking on the Start button and selecting Device Manager
- Expand the Display adapters category
- Right-click on your graphics card and select Properties
- Go to the Driver tab and click on Roll Back Driver
- Follow the on-screen instructions to revert to the previous version of the driver
- Uninstall and reinstall graphics drivers
- Open the Device Manager by right-clicking on the Start button and selecting Device Manager
- Expand the Display adapters category
- Right-click on your graphics card and select Uninstall device
- Click on Uninstall to confirm
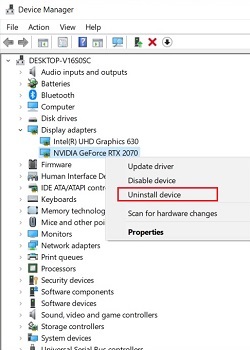
- Restart your computer
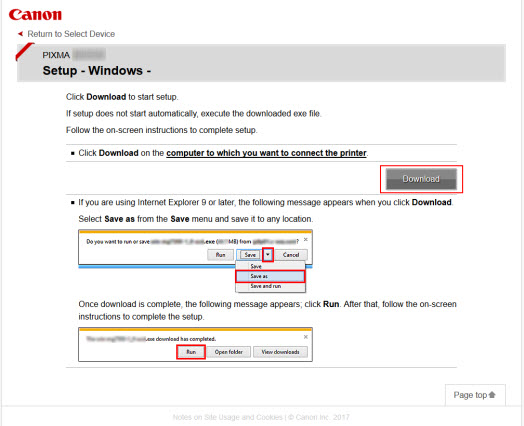
- Download the latest graphics driver from the manufacturer’s website
- Run the downloaded file and follow the on-screen instructions to install the driver
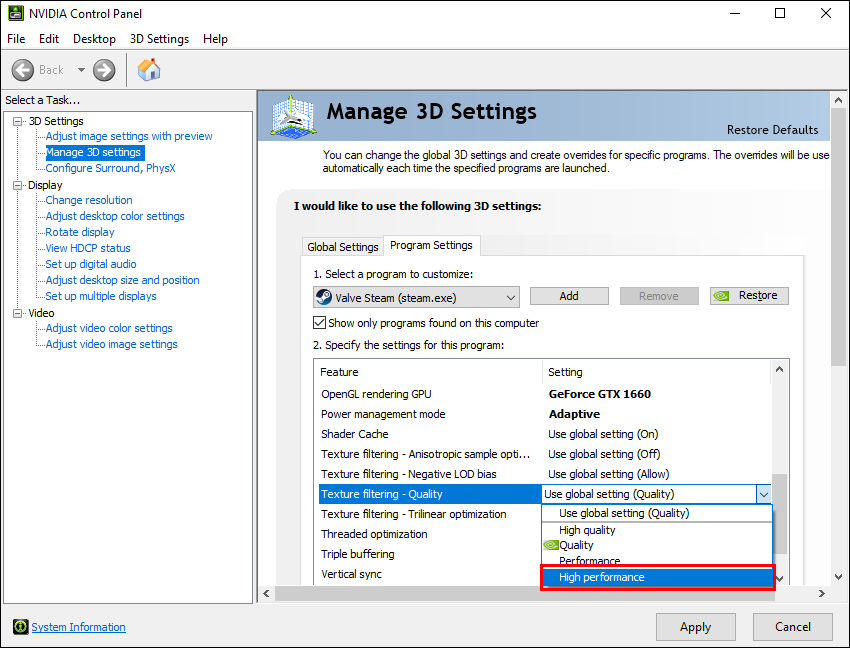
- Disable graphics card overclocking
- Open the graphics card control panel software (Nvidia Control Panel, AMD Catalyst, Intel Graphics Command Center)
- Look for the option related to overclocking or performance
- Disable any overclocking settings
- Apply the changes and restart your computer
- Reset graphics card settings to default
- Open the graphics card control panel software (Nvidia Control Panel, AMD Catalyst, Intel Graphics Command Center)
- Look for the option to reset or restore settings to default
- Click on the option and confirm the reset
- Restart your computer
- Clean install graphics drivers
- Download the latest graphics driver from the manufacturer’s website
- Download a graphics driver removal tool (e.g., Display Driver Uninstaller)

- Disconnect your computer from the internet
- Run the graphics driver removal tool to completely remove the existing graphics drivers
- Restart your computer
- Install the downloaded graphics driver
- Reconnect to the internet
- Follow the on-screen instructions to complete the installation
- Check for overheating
- Ensure proper ventilation and cooling for your computer
- Clean any dust or debris from the fans and vents
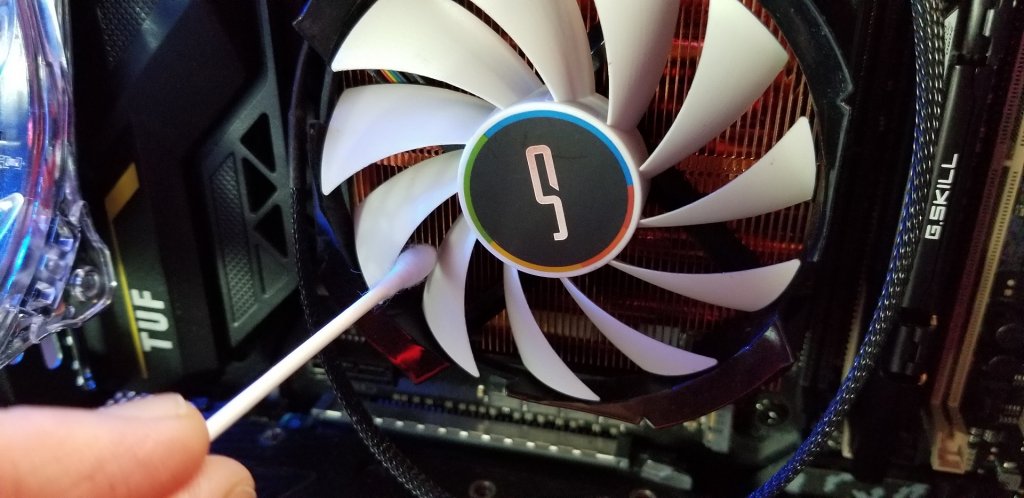
- Use monitoring software (e.g., MSI Afterburner, HWMonitor) to check the temperatures of your graphics card
- If temperatures are excessively high, consider improving airflow or replacing the thermal paste on your graphics card
- Seek professional assistance
- If none of the above steps resolve the issue, it is recommended to seek help from a professional technician or contact the graphics card manufacturer for further assistance
Cable issues
1. Check the cable connections: Ensure that all cables connecting your computer and monitor are securely plugged in.
2. Try a different cable: Swap out the current cable with a known working one to see if it resolves the issue.
3. Test the monitor on another device: Connect the monitor to a different computing device to determine if the problem lies with the monitor or the computer.
4. Update graphics drivers: Outdated or incompatible drivers can cause display issues. Visit the manufacturer’s website to download and install the latest drivers for your graphics card.
5. Adjust desktop resolution: Right-click on the desktop, select “Display settings,” and choose a resolution that is compatible with your monitor.
6. Check power settings: Make sure your monitor isn’t set to turn off after a certain period of inactivity.
7. Test with a different monitor: If possible, connect a different monitor to your computer to determine if the issue is specific to your current monitor.
8. Restart your computer: Sometimes a simple restart can resolve temporary glitches.
9. Consult a professional: If none of the above solutions work, it may be time to seek assistance from a professional technician.
Remember, cable issues can be a common cause of a randomly black screen, so it’s worth checking them first before exploring other solutions.
Monitor issues
- Make sure all cables (power, HDMI, VGA, etc.) connecting the monitor to the computer or power source are securely plugged in.
- If using an external monitor, ensure the cable connecting it to the computer is not damaged or loose.
- Try using a different cable or port to rule out any issues with the current setup.
2. Adjust power settings
- Access the power settings on your computer by clicking on the Start menu, then going to Control Panel or Settings, and selecting Power Options.
- Make sure the “Turn off the display” or similar option is set to a reasonable time interval, and not set to immediate or extremely short durations.

- Adjust any additional power settings related to display or screen sleep modes.
3. Update graphics drivers
- Open the Device Manager by pressing Win+X and selecting Device Manager from the menu.
- Expand the Display adapters category.
- Right-click on the graphics card driver and select Update driver.
- Choose the option to search automatically for updated driver software and follow the on-screen instructions.

4. Disable power-saving features
- Go to the Control Panel or Settings and access the Power Options menu.
- Select the “Change plan settings” option next to your active power plan.
- Click on “Change advanced power settings” to open the advanced power options dialog.
- Expand the “Display” category and disable any power-saving features such as “Dim display” or “Turn off display after”.
5. Scan for malware
- Run a full system scan using a reliable antivirus or antimalware program.
- Make sure the program’s virus definitions are up to date.
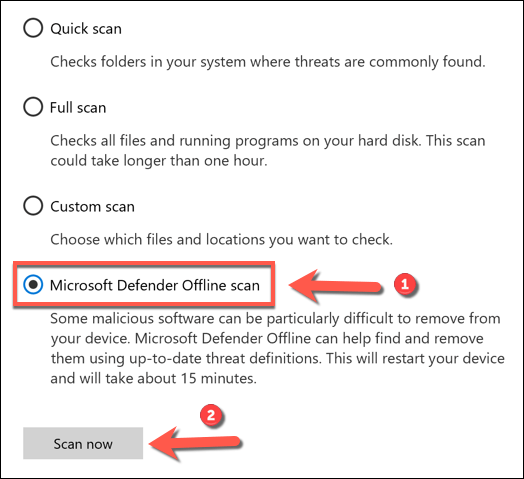
- If any malware is detected, follow the program’s instructions to remove it.
6. Check for overheating
- Ensure that the computer’s cooling system (fans, vents, etc.) is clean and functioning properly.
- If the computer is overheating, it may cause the monitor to go black as a protective measure.

- Consider using software to monitor the temperature of your computer’s components.
7. Test the monitor on another computer
- Disconnect the monitor from the current computer and connect it to another working computer.
- If the monitor works fine on the other computer, the problem may lie with the original computer’s hardware or software.

- If the monitor still goes black on the other computer, it indicates a potential issue with the monitor itself.
8. Perform a system restore
- Open the Start menu and search for “System Restore”.
- Select “Create a restore point” or “System Restore” from the search results.
- Follow the on-screen instructions to restore your computer to a previous working state.
- This can help if the issue started occurring after a recent software or driver installation.

9. Seek professional assistance
- If none of the above steps resolve the issue, it is recommended to contact a professional computer technician or the manufacturer’s support for further assistance.
- They can diagnose and repair any hardware or software problems that might be causing the monitor to go black.

GPU issues
1. Update your GPU drivers: Outdated drivers can often cause GPU issues. Visit the manufacturer’s website or use a reliable driver update tool to ensure you have the latest drivers installed.
2. Check for overheating: Overheating can lead to black screens. Clean your computer’s fans and vents regularly to prevent overheating.
3. Inspect the GPU connection: Ensure that the GPU is properly connected to the motherboard. Reseat the GPU if necessary.
4. Verify the monitor and cable: Check if the monitor or cable is faulty by testing them with another device.
5. Restart your computer: Sometimes a simple restart can resolve the issue by resetting the GPU.
6. Scan for malware: Malicious software can cause GPU problems. Run a full system scan with reliable antivirus software.
7. Disable unnecessary startup programs: Certain programs may conflict with the GPU. Disable unnecessary programs from starting up with your computer.
8. Adjust power settings: In some cases, power settings may interfere with the GPU. Optimize power settings for performance rather than energy saving.
9. Seek professional help: If none of the above fixes work, it may be time to consult a professional technician or contact the manufacturer for further assistance.
Remember, diagnosing and fixing GPU issues can vary based on your specific setup and hardware.
Power delivery issues
First, check all the connections between your computer and the monitor. Ensure that the cables are securely plugged in and that there are no loose connectors. If necessary, try using a different cable or port to see if that resolves the issue.
Update your graphics driver as outdated drivers can sometimes cause power delivery problems. Visit the manufacturer’s website or use a driver update tool to download and install the latest driver for your graphics card.
If the issue persists, you may need to check the power settings on your computer. Go to the Control Panel and navigate to the Power Options. Make sure that the settings are configured to prevent the screen from turning off automatically.
In some cases, a faulty power supply can be the culprit. Consider replacing the power supply unit if you suspect it’s causing the power delivery issues.
Remember, if you are unsure or uncomfortable performing any of these fixes, it’s always best to consult a professional technician for assistance.