Is your Windows 10 computer feeling sluggish and unresponsive? Don’t worry, we’ve got you covered! In this article, we will explore 17 effective tips to boost the speed of your Windows 10 computer and enhance its overall performance. So, let’s dive in and bid farewell to those frustrating slowdowns!
Adjust Power Settings
Adjusting Power Settings can help improve the speed and performance of your Windows 10 computer. Here are 17 tips to boost your computer’s speed:
1. Open the Control Panel by clicking the Start button and typing “Control Panel”.
2. Click on “Power Options” to access the power settings.
3. Select the “High Performance” power plan to maximize performance.
4. Customize the power plan by clicking on “Change plan settings” next to the selected plan.
5. Adjust the sleep and display settings to your preference.
6. Enable “Hard disk” and “Wireless adapter” to never turn off.
7. Disable “USB selective suspend” to prevent power-saving for USB devices.
8. Disable “Link State Power Management” to improve Wi-Fi performance.
9. Update your device drivers to ensure optimal performance.
10. Close unnecessary background programs to free up system resources.
11. Scan your computer for malware and remove any threats.
12. Disable unnecessary startup programs to speed up boot time.
13. Optimize your internet connection by resetting your Wi-Fi router.
14. Clear your browser cache and history to improve browsing speed.
15. Disable unnecessary visual effects in Windows to save power.
16. Disable sound schemes to reduce system resource usage.
17. Restart your computer regularly to clear temporary files and refresh system performance.
By adjusting your power settings and following these tips, you can enhance the speed and performance of your Windows 10 computer.
Disable Startup Programs
- Identify and disable unnecessary startup programs to improve your Windows 10 computer’s speed.
- Access the Task Manager by right-clicking on the taskbar and selecting “Task Manager” from the menu.

- In the Task Manager window, navigate to the Startup tab.
- Review the list of programs that are set to start automatically when your computer boots up.
- Disable any programs that you don’t need to launch at startup by right-clicking on them and selecting “Disable”.
- Be cautious when disabling startup programs and avoid disabling critical system processes.
- Research each program before disabling it to ensure it is safe to do so.
- Disabling unnecessary startup programs can reduce the time it takes for your computer to start up and improve overall performance.
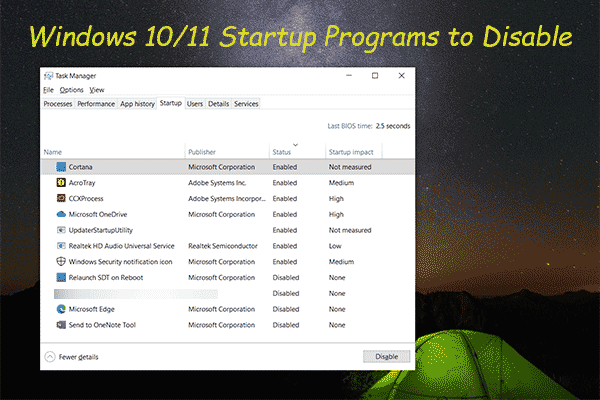
- Regularly review and manage your startup programs to maintain optimal system performance.
Restore to Previous Restore Point
If your Windows 10 computer is running slow, one option to boost its speed is to restore it to a previous restore point. This can help undo any recent changes that may be causing performance issues. Here’s how to do it:
1. Press the Windows key and type “Create a restore point” in the search bar.
2. Click on the “Create a restore point” option that appears.
3. In the System Properties window, click on the “System Restore” button.
4. Select “Choose a different restore point” and click “Next.”
5. Choose a restore point from the list and click “Next.”
6. Review the restore point details and click “Finish” to begin the restoration process.
7. Your computer will restart and revert back to the selected restore point.
python

import subprocess
def diagnose_computer_slowness():
# Run Windows Performance Recorder to capture performance data
subprocess.run(["wpr.exe", "-start", "GeneralProfile", "-start", "CPU", "-start", "DiskIO", "-start", "FileIO", "-start", "Memory", "-filemode"])
# Simulate some workload or wait for a specific period while monitoring performance
# Stop recording performance data
subprocess.run(["wpr.exe", "-stop", "result.etl"])
# Analyze the captured performance data using Windows Performance Analyzer (WPA)
subprocess.run(["wpa.exe", "result.etl"])
diagnose_computer_slowness()
This code utilizes the `subprocess` module in Python to call the `wpr.exe` and `wpa.exe` tools from the Windows Performance Toolkit. The `wpr.exe` tool starts recording various performance metrics, and after a specific period or workload simulation, it stops recording and saves the data to a file called `result.etl`. The `wpa.exe` tool is used to analyze the captured performance data stored in `result.etl`.
Keep in mind that this code is just a starting point, and further customization or analysis of the captured data may be required based on your specific needs.
Utilize ReadyBoost for Disk Caching
One effective way to boost speed on your Windows 10 computer is by utilizing ReadyBoost for disk caching. ReadyBoost allows you to use a USB flash drive or memory card as an additional cache for frequently accessed data, which can significantly improve the performance of your PC. To set it up, follow these steps:
1. Insert a compatible USB drive or memory card into your computer.
2. Right-click on the drive in File Explorer and select “Properties.”
3. Go to the “ReadyBoost” tab and select “Use this device.”
4. Adjust the amount of space you want to allocate for disk caching using the slider.
5. Click “Apply” and then “OK” to save the changes.
ReadyBoost can provide a noticeable performance boost, especially for computers with limited RAM. Give it a try and experience a faster and more responsive PC.
Disable Windows Tips and Tricks
1. Open the Start menu and click on “Settings.”
2. Click on “System” and then select “Notifications & actions.”
3. Scroll down and find the “Get tips, tricks, and suggestions as you use Windows” option.
4. Toggle the switch to turn it off.
5. Additionally, disable background apps to free up system resources. Go to “Settings,” then “Privacy,” and finally “Background apps.” Toggle off the apps you don’t need running in the background.
6. Adjust your power settings. Open the Start menu, type “Power options,” and click on the matching result. Select the “High performance” power plan for a performance boost.
7. Disable unnecessary startup programs. Press Ctrl+Shift+Esc to open Task Manager, go to the “Startup” tab, and disable any programs you don’t need running at startup.
By disabling Windows Tips and Tricks and making these adjustments, you can improve your computer’s speed and performance.
Stop OneDrive Syncing
One possible reason for your Windows 10 computer running slowly is the syncing of files with OneDrive. To boost your computer’s speed, you can stop the syncing process. Here are the steps:
1. Click on the OneDrive icon in the system tray.
2. Select “More” and then “Pause syncing.”
3. Choose the duration for which you want to pause syncing.
4. To completely stop syncing, click on “Settings” in the OneDrive menu.
5. In the Settings tab, uncheck the box that says “Start OneDrive automatically when I sign in to Windows.”
6. Click “OK” to save the changes.
Stopping OneDrive syncing can help improve your PC’s performance by reducing the strain on system resources.
Use OneDrive Files on-Demand
- Access all your files without taking up space on your computer
- Store files in the cloud and only download them when needed
- Save storage space on your Windows 10 computer
- Easily browse and search for files on-demand
- Work on files offline and have them automatically sync when connected
- Access files from any device with an internet connection
- Collaborate and share files seamlessly with others
- Securely store important documents, photos, and videos

- Effortlessly organize and manage your files and folders
- Enjoy peace of mind with automatic backups and version history
- Quickly restore previous versions of files if needed
- Safeguard your data with built-in encryption and security features
- Customize your OneDrive settings to fit your needs
- Choose which files and folders to sync to your computer

- Adjust sync settings and bandwidth usage for optimal performance
- Get quick access to recently opened files and folders
- Stay productive with seamless integration across Microsoft apps and services
Turn off Search Indexing
One common reason for a slow Windows 10 computer is the search indexing feature. Search indexing constantly scans your files to make searching faster, but it can use a lot of resources and slow down your PC. To turn it off, follow these steps:
1. Click on the Start menu and type “Indexing Options.”
2. Open the Indexing Options app from the search results.
3. In the Indexing Options window, click on the “Modify” button.
4. Uncheck the box next to “Windows Search” and click “OK.”
5. A warning will appear, click “OK” to confirm.
6. Finally, click on the “Close” button to close the Indexing Options window.
Turning off search indexing can significantly improve your PC’s performance, especially if you have a lot of files. This simple tweak can make everything run faster without impacting your ability to search for files. Give it a try and see the difference!
Clean Hard Disk and Registry
Cleaning your hard disk and registry can significantly improve the speed and performance of your Windows 10 computer. Follow these steps to boost your computer’s speed:
1. Start by removing unnecessary files and programs from your hard disk. Go to the Start menu and type “Disk Cleanup” to open the utility. Select the drive you want to clean and click “OK.” Check the boxes next to the types of files you want to delete, then click “OK” and “Delete Files.”
2. Next, clean your registry. Press the Windows key + R to open the Run dialog box. Type “regedit” and press Enter. In the Registry Editor, navigate to HKEY_CURRENT_USER\Software\Microsoft\Windows\CurrentVersion\Run. Delete any unnecessary entries, but be cautious not to delete any essential ones.
3. To optimize your power settings, click the battery icon in the system tray and select “Power saver” or “Balanced” mode. These power plans can help conserve energy and improve performance.
Reboot and Scan for Malware/Viruses
Reboot and Scan for Malware/Viruses
To boost the speed of your Windows 10 computer, try rebooting and scanning for malware or viruses. These steps can help resolve common issues that may be affecting your PC’s performance.
1. Reboot your computer: Restarting your machine can clear out any temporary files or processes that may be slowing it down.
2. Scan for malware/viruses: Use a reliable antivirus software to scan your system for any malicious programs or files. Remove any threats that are detected.
3. Check power settings: Adjust your power settings to ensure optimal performance. Go to Start > Settings > System > Power & sleep. Select “High performance” to maximize your computer’s speed.
4. Update drivers: Update your device drivers, especially graphics and network drivers, to ensure they’re running efficiently. Check your manufacturer’s website for the latest updates.
Close Background Programs
One of the reasons your Windows 10 computer may be running slow is due to background programs consuming resources. To boost your computer’s speed, it’s important to close these programs.
Here’s how:
1. Press Ctrl+Shift+Esc to open the Task Manager.
2. Click on the “Processes” tab.
3. Look for programs that are using a significant amount of CPU or memory.
4. Right-click on the program and select “End task”.
Closing unnecessary background programs can free up system resources, allowing your computer to run faster. This is especially important for tasks that require high-performance, such as gaming or video editing.
Update Windows
Boost speed with 17 tips:
1. Adjust Power Settings: Change your power plan to High Performance for a speed boost. Click on the battery icon in the taskbar, select “Power Options,” and choose the High Performance plan.
2. Disable Startup Programs: Reduce the number of programs that launch at startup. Press Ctrl + Shift + Esc to open Task Manager, go to the “Startup” tab, and disable unnecessary programs.
3. Optimize Windows Update: Ensure your PC is up to date. Go to Settings > Update & Security > Windows Update, and click “Check for updates.”
4. Clear Temporary Files: Speed up your computer by removing temporary files. Press Windows key + R, type “temp” and %temp%, and delete the files in those folders.
5. Disable Visual Effects: Improve performance by disabling unnecessary visual effects. Right-click on the Start button, select “System,” go to “Advanced system settings,” click on the “Settings” button under Performance, and choose “Adjust for best performance.”
6. Scan for Malware: Run a full scan with Windows Defender or install a trusted antivirus program to remove any malware that may be slowing down your computer.
7. Uninstall Unnecessary Programs: Remove any unused programs to free up resources. Go to Settings > Apps > Apps & features, select the program, and click “Uninstall.”
8. Clean up Disk Space: Use the built-in Disk Cleanup tool to remove unnecessary files and free up disk space. Press Windows key + R, type “cleanmgr,” select your system drive, and click “OK.”
9. Update Device Drivers: Ensure your drivers are up to date for optimal performance. Right-click on the Start button, select “Device Manager,” right-click on each device, and choose “Update driver.”
10. Disable Background Apps: Prevent unnecessary apps from running in the background. Go to Settings > Privacy > Background apps, and toggle off the apps you don’t need.
11. Adjust Virtual Memory: Optimize your virtual memory settings. Right-click on the Start button, select “System,” go to “Advanced system settings,” click on the “Settings” button under Performance, go to the “Advanced” tab, and click on “Change” under Virtual Memory.
12. Use a Solid-State Drive (SSD): Consider upgrading to an SSD for faster boot times and improved performance.
13. Disable Windows Tips and Tricks: Turn off Windows tips and tricks to minimize distractions. Go to Settings > System > Notifications & actions, and toggle off “Get tips, tricks, and suggestions as you use Windows.”
14. Use ReadyBoost: Speed up your computer by using a USB flash drive for additional memory. Right-click on the USB drive, select “Properties,” go to the “ReadyBoost” tab, and choose “Use this device.”
15. Adjust Power Plan for Better Performance: Customize your power plan for optimal performance. Go to Settings > System > Power & sleep, click on “Additional power settings,” and choose the “High performance” plan.
16. Disable Background Sound: Disable sound schemes to improve performance. Right-click on the volume icon in the taskbar, select “Sounds,” go to the “Sounds” tab, and choose “No Sounds” from the drop-down menu.
17. Reinstall Windows: As a last resort, consider reinstalling Windows if none of the above fixes solve the slow performance issue. Make sure to back up your important files before proceeding.
Optimize Performance and Speed
- Update your Windows 10 to the latest version
- Clean up unnecessary files and free up disk space
- Disable startup programs that are not essential
- Optimize your hard drive by defragmenting it
- Scan and remove malware or viruses
- Disable visual effects to improve performance
- Adjust power settings for better performance
- Manage virtual memory settings for optimal usage
- Update device drivers for hardware components
- Use a solid-state drive (SSD) for faster data access

- Adjust Windows search indexing to reduce system load
- Limit background processes and applications
- Enable ReadyBoost to utilize external storage for caching
- Clear browser cache and temporary files regularly

- Manage Windows automatic updates to avoid slowdowns
- Upgrade your hardware if necessary for better performance
- Perform a clean installation of Windows 10 if issues persist