Welcome to the informative world of account security! In this article, we will delve into the process of unlocking a locked account after multiple unsuccessful login attempts. Discover the essential steps and strategies to regain access to your account efficiently and securely.
Managing Account Lockouts and Failed Logins
To manage account lockouts and failed logins, follow these steps:
1. Identify the username for the locked account. This can be found in the system logs or by checking with the user.
2. Log in to the system as a privileged user using SSH or Sudo.
3. Open the necessary file for your system’s account lockout policies. This could be the “password-auth” or “system-auth” file in the “/etc/pam.d/” directory.
4. Locate the line that controls the account lockout policy and edit it accordingly. You may need to consult your system documentation or a trusted resource like TechTarget for specific instructions.
5. Set the number of failed login attempts allowed before an account is locked. This should be a balance between security and user convenience.
6. Save the changes to the file and exit.
7. To unlock a locked account, use the command “sudo faillock –user USERNAME –reset“. Replace “USERNAME” with the username of the locked account.
8. Verify that the account is now unlocked by checking the account lockout status using the command “sudo faillock –user USERNAME“.
Remember, managing account lockouts and failed logins is an important aspect of system security. By following these steps, you can effectively protect your system from unauthorized access and potential security attacks.
Unlocking User Accounts in RHEL-like OS
To unlock a locked account in a RHEL-like OS, follow these steps:
1. Log in to the system using an account with administrative privileges.
2. Open the terminal and enter the command sudo faillock –user [username] –reset, replacing [username] with the locked user account’s name.
3. Verify that the account has been unlocked by running the command sudo faillock –user [username]. The attempts status should show as “0” or “unlimited” instead of a number.
4. If the account is still locked, check the account lockout policy in the system-auth and password-auth files located in the /etc/pam.d directory.
5. Adjust the account lockout policy if needed, making sure to follow best practices for security.
6. Save the changes and exit the editor.
7. Test the account by attempting to log in using SSH or other methods.
8. If the account remains locked, consider seeking assistance from a system administrator or referring to relevant documentation or support resources.
Remember, unlocking a locked account is an important aspect of maintaining system security and user experience. By following these steps, you can quickly resolve account lockouts and ensure smooth access to your RHEL-like OS.
Implementing Account Lockout Policies for Enhanced Security
- Understanding Account Lockout Policies: Learn how implementing account lockout policies can enhance the security of your system.
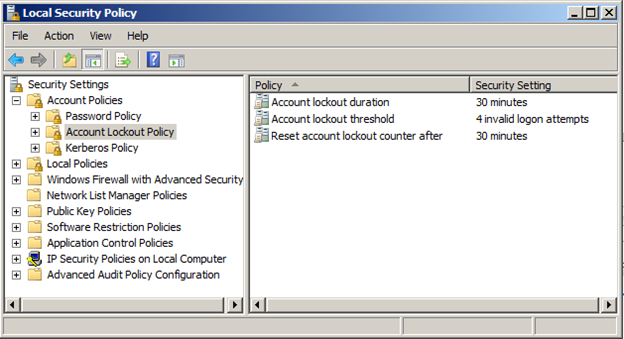
- Setting Lockout Thresholds: Determine the maximum number of failed login attempts allowed before an account is locked.
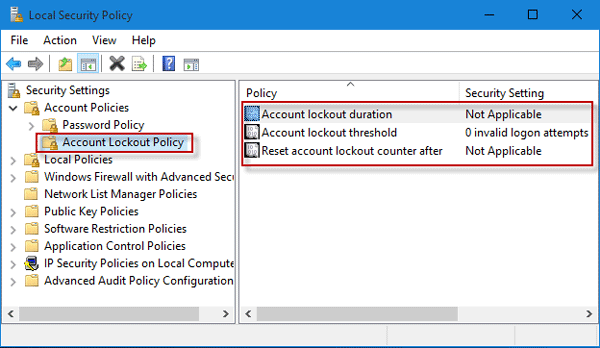
- Defining Lockout Duration: Specify the duration for which an account remains locked after reaching the lockout threshold.
- Configuring Account Lockout Reset: Decide whether an account should automatically reset after a certain period or if manual intervention is required.
- Implementing Incremental Lockout: Explore the option to increase the lockout duration with each subsequent failed login attempt.
- Monitoring and Auditing: Regularly review and analyze account lockout logs to detect suspicious activities and potential security threats.
- Providing User Notifications: Inform users about account lockouts through clear and concise notifications, including instructions for account recovery.
- Training and Education: Educate users on best practices for creating strong passwords and maintaining good login hygiene to prevent account lockouts.
- Implementing Two-Factor Authentication: Strengthen security by combining password-based authentication with an additional layer of verification, such as biometrics or one-time passwords.
- Regularly Updating and Patching Systems: Keep your systems up to date with the latest security patches and fixes to minimize vulnerabilities that could lead to unauthorized access attempts.
python

import time
class Account:
def __init__(self, username, password, max_login_attempts=3, lockout_duration=60):
self.username = username
self.password = password
self.max_login_attempts = max_login_attempts
self.lockout_duration = lockout_duration
self.login_attempts = 0
self.locked_until = None
def login(self, entered_password):
if self.locked_until and time.time() < self.locked_until:
print("Account is locked. Please try again later.")
return False
if entered_password == self.password:
print("Login successful!")
self.login_attempts = 0
return True
else:
self.login_attempts += 1
if self.login_attempts >= self.max_login_attempts:
self.locked_until = time.time() + self.lockout_duration
print("Too many failed login attempts. Account locked for {} seconds.".format(self.lockout_duration))
else:
print("Invalid password. Please try again.")
return False
# Usage example
account = Account("myusername", "mypassword")
while not account.login(input("Enter password: ")):
pass # Keep prompting until successful login or account is locked
This code demonstrates a basic implementation of an account lockout mechanism. The `Account` class takes a `username`, `password`, `max_login_attempts`, and `lockout_duration` as arguments. The `login` method is used to verify the entered password and track failed login attempts.
If the password matches, it returns `True` indicating a successful login. If the password is incorrect, it increments the login attempts counter. If the number of failed attempts exceeds the maximum allowed, it locks the account by setting the `locked_until` timestamp. During the lockout period, subsequent login attempts will display an appropriate message and prevent access.
Please note that this is a simplified example, and in a real-world scenario, you would likely incorporate other security measures, such as hashing and salting passwords, storing account information securely, and implementing additional checks to prevent brute-force attacks.
Considerations and Limitations of Account Lockout Policies
When dealing with locked accounts after failed logins, it’s crucial to consider the limitations and potential issues that may arise.
Firstly, it’s important to understand that account lockout policies may differ depending on the operating system being used. For example, in Linux, the “faillock” utility can be used to manage account lockouts.
Additionally, the specific user account and its privileges play a significant role in the lockout process. For SSH logins, the “sshd_config” file must be configured to enforce password lockout after a certain number of attempts.
The reset strategy for locked accounts is also a critical factor. It’s essential to have a well-defined process in place to unlock the account and ensure the security of the system.
Furthermore, the importance of auditing and monitoring login attempts cannot be overstated. Keeping track of failed login attempts and their status can help identify potential security threats and take appropriate action.
In conclusion, when dealing with locked accounts, it is vital to consider the limitations and potential issues specific to the user accounts, operating system, and security policies in place. By understanding these considerations and implementing the necessary measures, such as auditing and reset strategies, you can effectively manage locked accounts and maintain the security of your system.
(Reference: TechTarget – “Unlocking a Locked Account After Failed Logins”)