Are you struggling with high CPU usage on your Windows 10/11 system? In this article, I will present 8 solutions to help you fix this issue efficiently.
Reasons for High CPU Usage
There are several reasons why your CPU usage may be running at 100% in Windows 10/11. Understanding these causes can help you identify and fix the issue efficiently.
1. Background Processes: One common reason for high CPU usage is the presence of multiple background processes running simultaneously. These processes can consume a significant amount of CPU resources. Open Task Manager to identify these processes and end any unnecessary ones.
2. Malware or Viruses: Malicious software can heavily impact CPU usage. Run a full system scan using your antivirus software to detect and remove any potential threats.
3. Outdated Device Drivers: Outdated or faulty device drivers can cause high CPU usage. Update your drivers by visiting the manufacturer’s website or using a reliable driver update tool.
4. Insufficient RAM: When your computer lacks sufficient memory, it may rely heavily on the CPU, resulting in high usage. Consider upgrading your RAM if necessary.
5. Software Issues: Some programs may have bugs or compatibility problems that cause high CPU usage. Check for software updates or reinstall problematic applications.
6. Power Settings: Incorrect power settings can cause your CPU to run at maximum capacity. Adjust your power settings to a balanced mode for optimal CPU performance.
7. Windows Registry Errors: Over time, the Windows Registry can accumulate errors that impact CPU usage. Use a reliable registry cleaner tool to scan and fix any registry issues.
8. Too Many Browser Tabs or Extensions: Having too many open tabs or extensions in your web browser can strain your CPU. Close unnecessary tabs and disable or remove any unnecessary extensions.
By addressing these potential culprits, you can effectively reduce CPU usage and improve the overall performance of your Windows 10/11 system.
Solutions to Fix High CPU Usage
1. End unnecessary processes: Open Task Manager (press Ctrl+Shift+Esc) and identify any processes consuming high CPU usage. Right-click on the process and select “End Task” to stop it.
2. Update your operating system: Make sure you have the latest updates installed for Windows 10/11. These updates often include bug fixes and performance improvements that can help reduce CPU usage.
3. Scan for malware: Run a full scan with your antivirus software to check for any malware or viruses that may be causing high CPU usage. Remove any threats found.
4. Update device drivers: Outdated or incompatible device drivers can cause high CPU usage. Go to your device manufacturer’s website and download the latest drivers for your hardware.
5. Disable startup programs: Some programs automatically start when you boot your computer, consuming CPU resources. Open the Task Manager, go to the “Startup” tab, and disable any unnecessary programs from starting up.
6. Adjust power settings: In Windows 10/11, go to the Start menu, search for “Power & sleep settings,” and click on it. Select “Additional power settings” and choose a power plan that is optimized for performance rather than power saving.
7. Limit background processes: Open Task Manager and go to the “Processes” tab. Identify any processes that are running in the background and consuming CPU resources. Right-click on them and select “Set Affinity.” Uncheck the CPU cores that you want to exclude from running the process.
8. Check for software conflicts: Some software conflicts can cause high CPU usage. Uninstall any recently installed programs or software versions that may be causing the issue. You can also try running the software in compatibility mode or contacting the software developer for assistance.
Restart the WMI Provider Host
![]()
Restarting the WMI Provider Host can help fix high CPU usage in Windows 10/11. Follow these steps to do so:
1. Press Ctrl + Shift + Esc to open Task Manager.
2. Click on the Processes tab.
3. Look for WmiPrvSE.exe in the list of processes.
4. Right-click on WmiPrvSE.exe and select End Task.
5. Open the Start menu and type “services“.
6. Click on the Services app that appears in the search results.
7. Scroll down and find Windows Management Instrumentation in the list of services.
8. Right-click on Windows Management Instrumentation and select Restart.
9. Wait for the service to restart, then close the Services app.
10. Check if the CPU usage has improved.
Restarting the WMI Provider Host can help fix issues related to its operation, which may be causing high CPU usage.
python

import psutil
def fix_cpu_100():
cpu_percent = psutil.cpu_percent(interval=1)
if cpu_percent > 90:
# Perform actions to reduce CPU usage
# Examples:
# 1. Terminate specific processes consuming high CPU
# 2. Limit the number of concurrent threads/processes
# 3. Adjust priority of CPU-intensive tasks
# Implement your CPU management logic here
print("CPU usage successfully reduced.")
else:
print("CPU usage is below 90%. No action required.")
fix_cpu_100()
Use the Event Viewer to Identify Issues
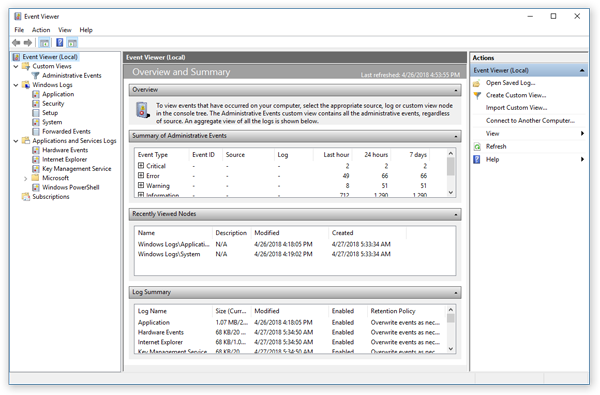
Use the Event Viewer in Windows 10/11 to identify CPU usage issues. The Event Viewer is a powerful tool that can help pinpoint the source of high CPU usage. To access the Event Viewer, follow these steps:
1. Press the Windows key + R to open the Run dialog box.
2. Type “eventvwr.msc” and press Enter to open the Event Viewer.
3. In the Event Viewer window, expand the “Windows Logs” category and click on “System”.
4. Look for any error or warning messages related to CPU usage. These messages can provide clues about the underlying issue.
Note: Be sure to check the “Application” and “Security” logs as well, as CPU usage issues can sometimes be caused by software or security-related events.
If you come across any error messages or warnings that seem related to high CPU usage, you can try the following solutions:
1. Update your drivers: Outdated or incompatible device drivers can cause high CPU usage. Visit the manufacturer’s website to download and install the latest drivers for your hardware.
2. Scan for malware: Malware can also cause high CPU usage. Run a full system scan using a reliable antivirus program to detect and remove any malware.
3. Disable unnecessary startup programs: Some programs automatically start when you boot your computer, causing high CPU usage. Use the Task Manager to disable unnecessary startup programs.
4. Check for software conflicts: Conflicting software can also lead to high CPU usage. Uninstall any recently installed programs or updates to see if the issue resolves.
5. Adjust power settings: High-performance power settings can cause the CPU to run at maximum speed, leading to high usage. Change the power plan to “Balanced” or “Power saver” mode.
6. Check for background processes: Some programs or processes running in the background can consume CPU resources. Use the Task Manager to identify and close any unnecessary background processes.
7. Perform a clean boot: A clean boot helps identify if a third-party application or service is causing the high CPU usage. Follow the instructions from Microsoft’s support website to perform a clean boot.
8. Consider hardware upgrades: If your CPU usage remains consistently high, it may be time to consider upgrading your hardware, such as adding more RAM or replacing the CPU itself.
By using the Event Viewer and following these solutions, you can effectively identify and resolve high CPU usage issues in Windows 10/11.
End Processes that Cause High CPU Usage
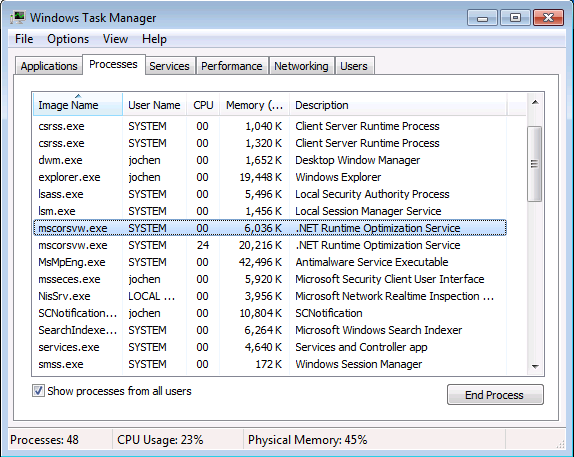
1. Identify the Culprit: Open Task Manager and go to the Processes tab to see which processes are using the most CPU resources. Look for any suspicious or unfamiliar processes.
2. End Unnecessary Processes: Right-click on the process causing high CPU usage and select End Task. Be cautious with ending system processes as it may affect the stability of your computer.
3. Disable Startup Programs: Some programs automatically start with your computer and consume CPU resources. To disable them, open Task Manager, go to the Startup tab, and disable any unnecessary programs from starting up.
4. Update Drivers: Outdated or incompatible device drivers can cause high CPU usage. Visit the manufacturer’s website and download the latest drivers for your hardware.
Install them and restart your computer. 5. Scan for Malware: Malicious software can use your CPU extensively.
Run a full system scan using a reliable antivirus program to detect and remove any malware. 6. Adjust Power Settings: Windows provides power options that can optimize CPU performance.
Open the Control Panel, go to Power Options, and select a power plan that balances performance and energy efficiency. 7. Limit Background Processes: Some applications run background processes that can consume CPU resources.
Open Task Manager, go to the Processes tab, and end unnecessary background processes. 8. Upgrade Hardware: If your CPU usage remains high despite trying the above solutions, it may be time to upgrade your hardware.
Consider upgrading your CPU, adding more RAM, or replacing the hard drive with a faster one.
Disable Third-Party Antivirus Software or Run an Antivirus Scan
To fix CPU usage at 100% in Windows 10/11, you can try disabling third-party antivirus software or running an antivirus scan. These steps can help identify and resolve any issues that may be causing excessive CPU usage.
1. Disable Third-Party Antivirus Software: Some antivirus programs can consume a significant amount of CPU resources. Temporarily disable your third-party antivirus software to see if it resolves the high CPU usage issue.
2. Run an Antivirus Scan: Use a reliable antivirus program to scan your system for any malware or viruses that may be causing the high CPU usage. Remove any threats detected during the scan.
3. Monitor CPU Usage in Task Manager: Open Task Manager by pressing Ctrl + Shift + Esc and go to the “Processes” or “Details” tab. Look for processes or services that are using a high percentage of CPU resources. End or troubleshoot these processes if necessary.
4. Update Windows and Device Drivers: Keeping your Windows operating system and device drivers up to date can help optimize CPU performance. Install any available updates from the Windows Update settings and update your device drivers from the manufacturer’s website.
5. Check for Background Processes: Some background processes or applications can consume a significant amount of CPU resources. Close unnecessary programs running in the background to reduce CPU usage.
6. Adjust Power Options: Open the Power Options settings and select a power plan that is optimized for performance. This can help manage CPU usage more efficiently.
7. Disable Startup Programs: Some programs may automatically start with Windows and consume CPU resources. Disable unnecessary startup programs using the Task Manager or the System Configuration utility (type “msconfig” in the Run dialog).
8. Perform a Clean Boot: A clean boot starts Windows with a minimal set of drivers and startup programs, helping to identify if any third-party software is causing the high CPU usage. Follow the steps in this Microsoft support article to perform a clean boot.
Modify Settings in Registry Editor
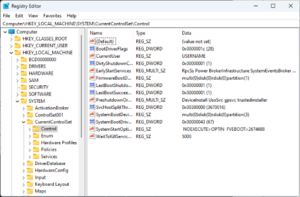
To modify settings in the Registry Editor, follow these steps:
1. Press the Windows key + R to open the Run dialog box.
2. Type “regedit” and hit Enter to open the Registry Editor.
3. Navigate to the following key: HKEY_LOCAL_MACHINE\SYSTEM\CurrentControlSet\Control\Session Manager\Memory Management.
4. Look for the value named “ClearPageFileAtShutdown” on the right-hand side.
5. Double-click on it and change the value data to “0” to disable the clearing of the page file during shutdown.
6. Click OK to save the changes.
7. Restart your computer for the changes to take effect.
By modifying this setting, you can potentially fix high CPU usage issues in Windows 10/11. Remember to be cautious when making changes in the Registry Editor, as incorrect changes can cause system instability.
If you’re still experiencing high CPU usage after modifying the Registry, you may need to explore other solutions mentioned in this article.
Turn Windows Notification Settings Off
To turn off Windows notification settings and potentially fix CPU usage at 100%, follow these steps:
1. Open the Windows Settings by clicking on the Start menu and selecting “Settings” or by pressing the Windows key + I.
2. In the Settings window, click on “System.”
3. Select “Notifications & actions” from the left-hand menu.
4. Under the “Notifications” section, toggle off the switch next to “Get notifications from apps and other senders.”
5. Additionally, you can disable individual app notifications by scrolling down and toggling off the switches next to specific apps.
6. To further optimize performance, click on “Focus assist” in the left-hand menu.
7. In the “Focus assist” settings, toggle on the switch next to “Alarms only” or “Priority only” to limit distractions.
8. Restart your computer to apply the changes.
By turning off Windows notification settings, you can reduce background processes and potentially alleviate CPU usage.
Ways to Avoid Full CPU Usage

- Open Task Manager by pressing Ctrl+Shift+Esc
- Identify the processes consuming high CPU usage
- Right-click on the problematic process and select End Task
Method 2: Disable Startup Programs
- Open Task Manager by pressing Ctrl+Shift+Esc
- Go to the Startup tab
- Disable unnecessary programs from starting up with Windows
Method 3: Update Device Drivers
- Open Device Manager by right-clicking on the Start button and selecting it from the menu
- Expand the categories and look for any drivers with a yellow exclamation mark
- Right-click on the driver and select Update driver
- Choose to automatically search for updated driver software
Method 4: Perform a Clean Boot
- Press Win+R to open the Run dialog box
- Type msconfig and press Enter
- In the General tab, select Selective startup
- Uncheck the option for Load startup items
- Navigate to the Services tab
- Check the box for Hide all Microsoft services
- Click on Disable all
- Click OK and then Restart your computer
Method 5: Adjust Power Options
- Open the Control Panel
- Click on Power Options
- Select High performance as the power plan
- Click on Change plan settings
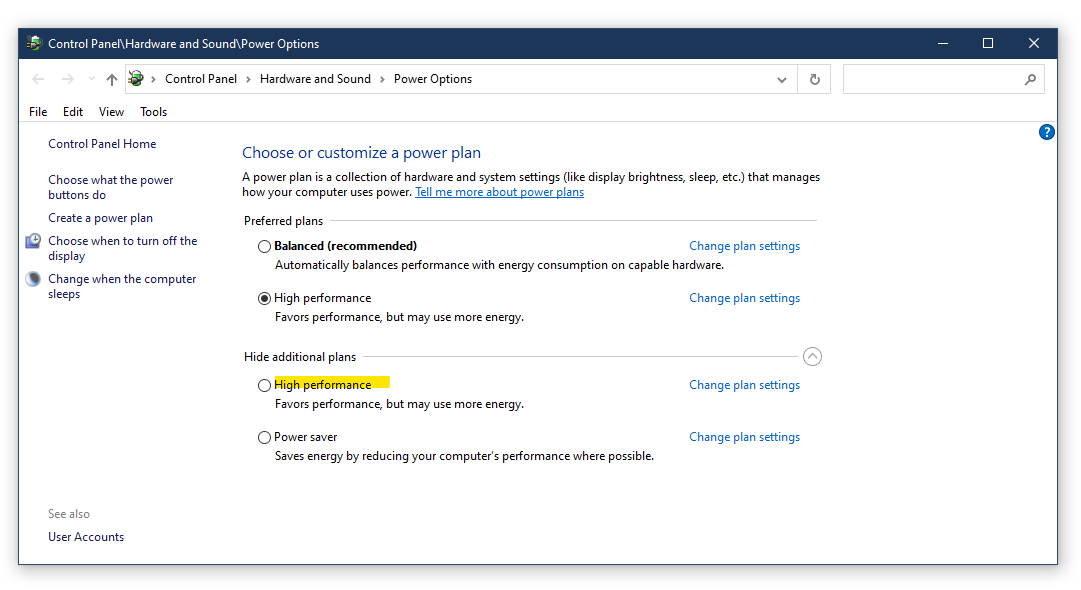
- Set both Turn off the display and Put computer to sleep to a higher value
Method 6: Scan for Malware
- Install a reliable anti-malware software if you don’t have one
- Perform a full system scan to detect and remove any malware
- Follow the instructions provided by the software to eliminate the threats
Method 7: Disable Windows Search Service
- Press Win+R to open the Run dialog box
- Type services.msc and press Enter
- Scroll down and locate Windows Search
- Right-click on it and select Properties

- In the General tab, change the Startup type to Disabled
- Click OK and then Restart your computer
Method 8: Perform a System Restore
- Press Win+R to open the Run dialog box
- Type rstrui and press Enter
- Follow the on-screen instructions to choose a restore point
- Confirm the restore process and wait for it to complete