Welcome to the ultimate guide on resolving the frustrating issue of Word’s spell check refusing to cooperate. Say goodbye to those embarrassing errors and join us as we uncover the secrets to fixing this maddening glitch once and for all.
Symptoms of Spell Check Not Working in Word
1. No red squiggly lines: One of the most obvious symptoms of spell check not working in Word is the absence of red squiggly lines under misspelled words. This indicates that Word is not detecting any spelling errors in your document.
2. No suggestions for misspelled words: Another symptom is the lack of suggestions for misspelled words. Normally, Word provides a list of suggested corrections when you right-click on a misspelled word, but if spell check is not working, this feature will be unavailable.
3. No automatic corrections: Spell check in Word also includes an automatic correction feature, where it automatically corrects certain spelling mistakes as you type. If this feature is not working, you will need to manually correct misspelled words.
To fix these symptoms and get spell check working again in Word, follow these troubleshooting steps:
1. Check language settings: Make sure the correct language is selected for your document. Go to the Review tab, click on the Language button, and select the appropriate language.
2. Enable proofing tools: In Word, go to File > Options > Proofing and ensure that the “Check spelling as you type” and “Mark grammar errors as you type” options are checked.
3. Repair or reinstall Word: If the above methods don’t work, try repairing or reinstalling Word. This can help resolve any program or installation issues that may be causing spell check to malfunction.
By addressing these symptoms and following the recommended solutions, you can fix Word’s spell check not working issue and ensure that your documents are error-free.
Possible Causes of Spell Check Not Working in Word
Possible causes of spell check not working in Word can vary, but there are a few common culprits to consider. One potential issue could be the proofing tools not being installed or enabled. To check this, go to the Review tab and click on the Spelling & Grammar button. If the options are grayed out, it means the proofing tools are not available.
To fix this, you’ll need to install or enable the proofing tools. Another potential cause could be the app language setting. If the spell checker is not working for a specific language, go to File > Options > Language and make sure the correct language is selected. If these methods don’t resolve the issue, you can try troubleshooting steps like repairing Office, disabling add-ins, or resetting Word settings.
Installing Proofing Tools to Fix Spell Check Not Working in Word
To fix the issue of spell check not working in Microsoft Word, you can try installing Proofing Tools. Here’s how:
1. Open Microsoft Word on your PC.
2. Go to the Microsoft Office website and search for “Proofing Tools.”
3. Download and install the Proofing Tools add-in for your specific version of Word (e.g., Word 2010, Word 2013, etc.).
4. Once the installation is complete, open Word again.
5. Click on the “Review” tab at the top of the screen.
6. Look for the “Spelling & Grammar” group and click on the “Spelling & Grammar” button.
7. If you still encounter issues, click on the “File” tab, then go to “Options” and select “Proofing.”
8. Check if the “Exceptions for” section is set to “EN-US” (or your desired language).
9. Make sure the “Hide spelling errors in this document only” and “Hide grammar errors in this document only” options are unchecked.
10. Click “OK” to save your changes.
python

from spellchecker import SpellChecker
def spell_check(text):
spell = SpellChecker()
# Split input text into words
words = text.split()
# Find misspelled words
misspelled = spell.unknown(words)
# Print suggestions for each misspelled word
for word in misspelled:
print(f"Misspelled word: {word}")
suggestions = spell.candidates(word)
print(f"Suggestions: {suggestions}")
# Example usage
input_text = "Ths is a smple text with some misspleld wrds."
spell_check(input_text)
In this code, we import the `SpellChecker` class from the `spellchecker` library. We create an instance of this class and pass the input text to the `spell.unknown()` method to find the misspelled words. Then, we use the `spell.candidates()` method to get suggestions for each misspelled word. Finally, we print the misspelled word and its suggestions.
Enabling the Speller EN-US Add-in to Fix Spell Check Not Working in Word
To fix Word’s spell check not working issue, you can enable the Speller EN-US Add-in. Here’s how:
1. Open Word and go to the “File” tab.
2. Select “Options” from the menu.
3. In the Word Options window, click on “Add-Ins” in the left-hand menu.
4. At the bottom of the window, change the “Manage” dropdown to “Disabled Items” and click “Go”.
5. Check if the Speller EN-US Add-in is listed. If it is, select it and click “Enable”.
6. Close the Word Options window and restart Word.
If the Speller EN-US Add-in is not listed or enabling it doesn’t solve the issue, you can try the following:
– Update your Word or Office to the latest version.
– Check your PC’s language settings and make sure it matches the language of your Word document.
– Try using the built-in grammar checker instead of the spell checker.
– If you’re using Word on Mac, check for updates and ensure that the app language is set correctly.
These steps should help resolve the spell check not working problem in Word.
Enabling “Check spelling as you type” to Fix Spell Check Not Working in Word
To enable “Check spelling as you type” and fix the issue of spell check not working in Word, follow these steps:
1. Open Word and click on the “File” tab.
2. Select “Options” from the dropdown menu.
3. In the Word Options window, click on “Proofing” in the left-hand panel.
4. Make sure the “Check spelling as you type” option is checked.
5. Click on “OK” to save the changes.
If the spell check is still not working, try these additional solutions:
– Restart Word and check if the issue persists.
– Update your Word program to the latest version.
– Check if the language settings in Word match the language of your text.
– Disable any third-party grammar or spelling checkers that may be interfering with Word’s spell check.
By enabling “Check spelling as you type” and following these steps, you should be able to fix the spell check not working issue in Word.
Selecting Language and Clearing “Do not check spelling or grammar” to Fix Spell Check Not Working in Word
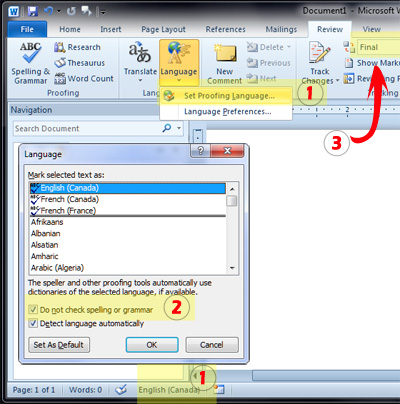
To fix Word’s spell check not working, you may need to select the correct language and clear the “Do not check spelling or grammar” option. Here’s how:
1. Open your Word document.
2. Click on the “Review” tab in the toolbar.
3. In the “Language” group, click on the “Language” button.
4. A window will appear with a list of languages. Select the appropriate language for your document.
5. If the “Do not check spelling or grammar” option is checked, uncheck it by following these steps:
a. Click on the “File” tab in the toolbar.
b. Click on “Options” at the bottom of the left-hand menu.
c. In the Word Options window, click on “Proofing” in the left-hand menu.
d. Under the “Exceptions for” section, make sure there are no words listed.
e. Under the “When correcting spelling and grammar in Word” section, make sure the “Do not check spelling or grammar” option is unchecked.
6. Click “OK” to save the changes.
These steps should help resolve the issue and get Word’s spell check working again.
Modifying the Registry to Fix Spell Check Not Working in Word
To fix spell check not working in Word, you can modify the registry settings. Here’s how:
1. Close all Word apps and other Office programs.
2. Press the Windows key + R to open the Run dialog box.
3. Type “regedit” and press Enter to open the Registry Editor.
4. In the left pane, navigate to HKEY_CURRENT_USER\Software\Microsoft\Office\Word\Addins\WordProof.
5. Right-click on the WordProof folder and select Delete.
6. Close the Registry Editor.
7. Open Word and go to the File tab.
8. Click on Options, then choose Proofing from the left pane.
9. Under the “When correcting spelling and grammar in Word” section, make sure the “Check spelling as you type” and “Mark grammar errors as you type” options are selected.
10. Click OK to save the changes.
By modifying the registry settings, you can resolve the issue with Word’s spell check not working. Just follow these steps carefully, and your spell check should be up and running again.
Fixing Spell Check Not Working in Word with Language Settings
If you’re experiencing issues with spell check not working in Word, it could be due to your language settings. Here’s how to fix it:
1. Open Word and click on the “File” tab in the top-left corner.
2. Select “Options” from the drop-down menu.
3. In the Word Options window, click on “Proofing” in the left-hand menu.
4. Under the “When correcting spelling and grammar in Word” section, click on the “Settings” button.
5. A new window will open, showing the “Language” settings. Make sure the correct language is selected for your document.
6. If the language you need is not listed, click on the “Add additional editing languages” link and follow the prompts to install the language pack.
7. Once you’ve made the necessary changes, click “OK” to save your settings.
Fixing Spell Check Not Working in Word by Turning off Disabling Add-ins
To fix the spell check not working in Word, you can try turning off any disabling add-ins. Here’s how:
1. Open Word and go to the “File” tab.
2. Click on “Options” in the left sidebar.
3. In the Word Options window, select “Add-Ins” from the left sidebar.
4. At the bottom of the window, next to “Manage,” make sure “COM Add-ins” is selected from the drop-down menu.
5. Click on the “Go…” button.
6. In the COM Add-Ins window, uncheck any add-ins that are enabled.
7. Click “OK” to save the changes and close the window.
8. Close and reopen Word to see if the spell check is working now.
If the spell check still isn’t working, you can try other troubleshooting steps or reach out to Microsoft support for further assistance.
Fixing Spell Check Not Working in Word by Turning off the Hide Spelling Error and Hide Grammar Error and Turning on Check Spelling as you Type
- Open Microsoft Word on your computer.
- Click on the “File” tab located at the top left corner of the screen.
- Select “Options” from the drop-down menu. This will open the Word Options window.
- In the Word Options window, click on the “Proofing” category on the left side.
- Under the “When correcting spelling and grammar in Word” section, make sure that the “Hide spelling errors in this document” and “Hide grammar errors in this document” options are unchecked.
- Check the box next to “Check spelling as you type” to enable the real-time spell check feature in Word.
- Click on the “OK” button to save the changes and close the Word Options window.
- Start typing in your Word document and you should now see the red underlines indicating spelling errors and the green underlines indicating grammar errors.
- Right-click on a word with a red underline to see suggested spelling corrections, and right-click on a word with a green underline to see suggested grammar corrections.
- Select the appropriate correction from the context menu to fix the errors.