I will discuss how to fix high CPU usage caused by the DISM Host Servicing Process.
Implement System File Checker and Repair Techniques
To fix high CPU usage related to the DISM Host Servicing Process, one effective solution is to implement System File Checker (SFC) and repair techniques. SFC is a built-in Windows utility that can scan and repair corrupted system files.
To run SFC, open Command Prompt as an administrator by searching for “cmd” in the Windows search bar, right-clicking on Command Prompt, and selecting “Run as administrator.” Then, type “sfc /scannow” and hit Enter to start the scan.
After the scan is complete, restart your computer to apply any repairs that were made. This process can help resolve issues with system files that may be causing high CPU usage.
Additionally, consider using the Deployment Image Servicing and Management (DISM) tool in conjunction with SFC for more comprehensive repairs. DISM can repair Windows images and help resolve system file corruption.
By utilizing these tools, you can effectively address high CPU usage caused by the DISM Host Servicing Process and improve the overall performance of your Windows system.
Modify Service Settings: Superfetch/SysMain and BITS
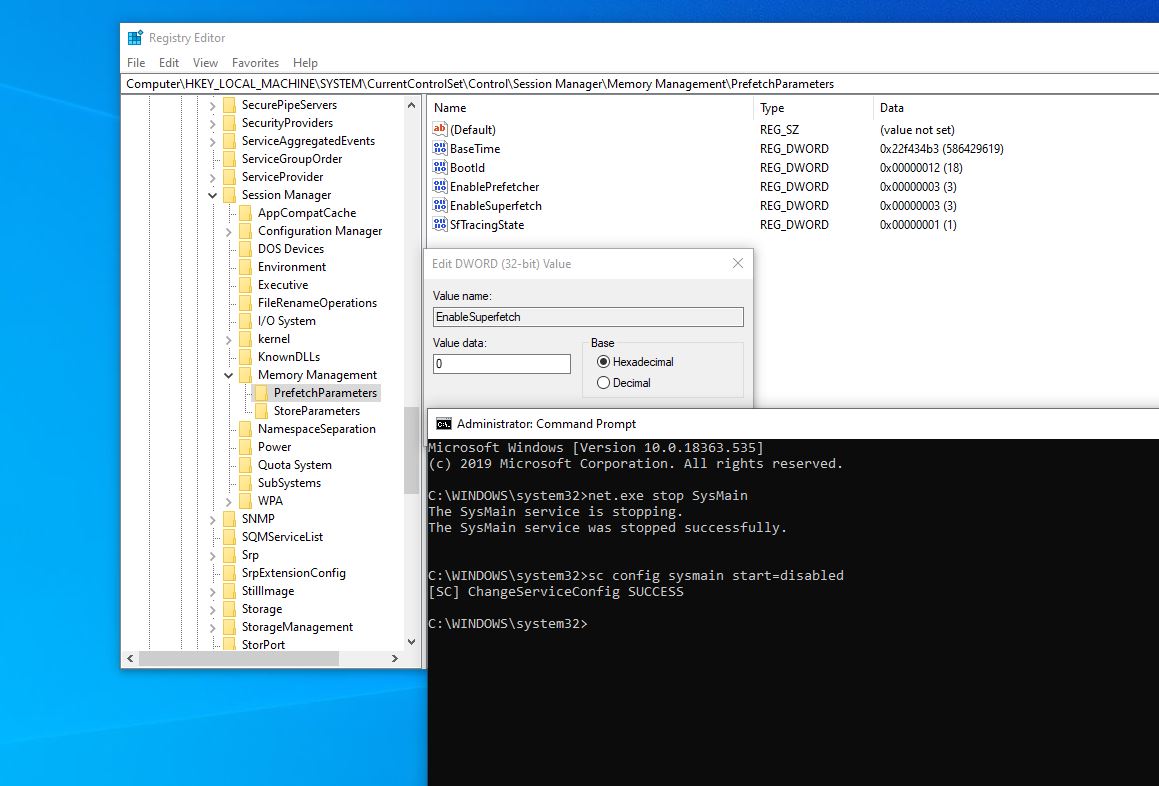
To modify Service Settings for Superfetch/SysMain and BITS, follow these steps:
– Press the Windows key + R to open the Run dialog box.
– Type services.msc and press Enter to open the Services window.
– Scroll down and locate the Superfetch service.
– Right-click on Superfetch and select Properties.
– In the Properties window, change the Startup type to Disabled.
– Click Apply and then OK to save the changes.
– Repeat the same steps for the Background Intelligent Transfer Service (BITS).
– After disabling both services, open the Task Manager and check if the DISM Host Servicing Process CPU usage has decreased.
Conduct Antivirus and Malware Scans

- Run a full antivirus scan on your computer
- Update your antivirus software to ensure it is current
- Perform a malware scan to check for any malicious software
- Remove any malware or viruses found during the scans
- Regularly schedule antivirus and malware scans to prevent future issues
Utilize DISM with an Appropriate Repair Source
When facing high CPU usage due to the DISM Host Servicing Process, it is crucial to use the Deployment Image Servicing and Management tool with the correct repair source to resolve the issue efficiently.
1. Open Command Prompt as an administrator by:
– Pressing the Windows key
– Typing “cmd”
– Right-clicking on “Command Prompt” and selecting “Run as administrator”
– Clicking “Yes” on the User Account Control prompt
2. Execute the DISM command with the appropriate repair source:
– Type the following command and press Enter:
dism /online /cleanup-image /restorehealth /source:WIM:X:\Sources\Install.wim:1 /limitaccess
– Replace “X” with the drive letter where the Windows installation media is located
3. Wait for the process to complete and then restart your computer to apply the changes.
Explore Cloud Reset and Clean Boot Options
To resolve high CPU usage caused by the DISM Host Servicing Process, you can try exploring Cloud Reset and Clean Boot Options. These methods can help in troubleshooting and fixing the issue efficiently.
Cloud Reset allows you to reset your Windows operating system by downloading a fresh copy from the cloud. This can help in resolving any corrupt files or settings that might be causing the high CPU usage.
On the other hand, performing a Clean Boot can help in identifying if a third-party application or service is causing the high CPU usage. By disabling all non-Microsoft services and startup programs, you can narrow down the source of the problem.
After trying these options, monitor the CPU usage in the Task Manager to see if the issue has been resolved. If the problem persists, you might need to consider other troubleshooting steps such as running a virus scan or checking for any corrupted system files using the Windows Assessment and Deployment Kit.
Frequently Asked Questions
How do I get rid of Dismhost?
To get rid of Dismhost, you can use antivirus software to scan and remove the file from your computer.
Why is Windows Update using so much CPU?
Windows Update is using so much CPU because there may be corrupt files causing the Windows Modules Installer Worker to overwork the CPU. Running the System File Checker can help repair these corrupt files and alleviate the issue.
Why is Wsappx using so much CPU?
Wsappx is using so much CPU because it activates and uses resources when you’re using the Microsoft Store, especially when downloading apps or installing updates which require additional resources for the install process.
What is the Wsappx process?
The Wsappx process is related to the Microsoft Store and Universal Windows Platform (UWP) apps, managing their installation, updates, and maintenance on the Windows operating system.