If you’re experiencing a frustrating delay with your Windows 10 computer, you’re not alone. A common issue is the “Just a Moment” screen that seems to take forever to load. But don’t worry – there are quick and easy solutions to get you past this hurdle.
Troubleshooting Windows 10 “Just a Moment” Issue
If you’re a Windows 10 user, you might have experienced the “Just a Moment” issue where your computer gets stuck on the loading screen. This problem can occur when you’re booting your computer or trying to sign in to your account. The issue can be caused by a number of things, including system failures, corrupt system files, or software limitations.
Fortunately, there are several solutions to this issue. One method is to restart your computer by pressing the power button. Another approach is to boot your computer in Safe Mode and try to fix the issue from there. You can also try installing updates or using the Windows 10 Media Creation Tool to fix the issue.
In some cases, the “Just a Moment” issue can be caused by peripherals like Bluetooth devices or functional software. If this is the case, try unplugging your peripherals or uninstalling the software to see if the issue goes away.
Solutions for a Stuck Windows 10 Boot Loop
Windows 10 is a powerful operating system with many features that can enhance your computer experience. However, sometimes you may encounter an issue where your computer is stuck in a boot loop or on the “Just a Moment” blue screen. This can be frustrating for users who want to get back to their work or other activities.
One solution to this issue is to try starting your computer in Safe Mode. This will allow you to access your system files and fix any issues that may be causing the boot loop. Another approach is to use the Windows 10 Media Creation Tool to create an installation medium and install the latest updates or fixes.
If you are still experiencing the same behavior, you can try logging in with your Microsoft account or using an unattend xml file to fix the issue. In some cases, the problem may be caused by corrupt files or startup software, in which case you may need to uninstall or disable these files or programs.
It is important to note that there may be limitations to these solutions, and in some cases, you may need to restart your computer or use the power button to force a restart. If all else fails, you may need to seek professional help to fix the issue. In any case, it is important to stay patient and keep trying different methods until you find a solution that works for you.
Configuring Windows 10 System Notifications
- Access the Notification settings by clicking on the Notification icon located on the bottom right corner of the Taskbar.
- Click on “All settings” and then select “System.”
- Click on “Notifications & actions” to view notification settings.
- To disable notifications for a specific app, toggle the switch to the “Off” position next to the app.
- To customize the behavior of notifications, click on “Get notifications from apps and other senders.”
- Toggle the switch next to “Show notifications on the lock screen” to turn it on or off.
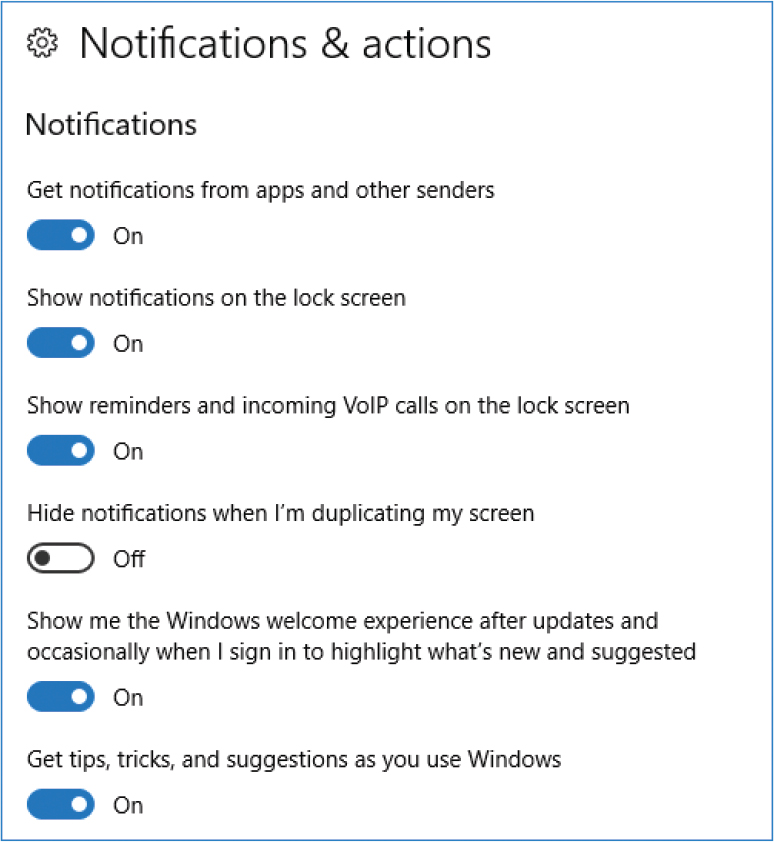
- To adjust the number of notifications that appear in the Action Center, click on “Number of notifications visible in action center.”
- Use the dropdown menu to select the number of notifications that you want to appear in the Action Center.
Disabling Automatic Restart in Windows 10
One of the common issues that Windows 10 users face is the “Just a Moment” blue screen that gets stuck in a loop during the login process. This could be due to various reasons such as system failure, corrupt system files, or software limitations. In such cases, the automatic restart feature of Windows 10 can cause inconvenience to users as it restarts the PC without providing a solution.
To fix this issue, users can disable the automatic restart feature in Windows 10. One way to do this is by accessing the System Notifications through the Settings option. Another approach is to use the Windows 10 Media Creation Tool to create an installation medium and boot the PC from it. Users can then select the Safe Mode option to disable the automatic restart feature.
Disabling automatic restart can help users to identify and fix the underlying problem causing the loop screen. This method can also be useful when installing updates or fixing other startup software functionalities.
Repairing Windows 10 with Media Creation Tool
One common issue that Windows 10 users face is the “Just a Moment” blue screen that appears during the login process. This screen can often get stuck in a loop, preventing users from accessing their PC. Fortunately, there are several solutions to fix the problem, including using the Windows 10 Media Creation Tool.
This tool is an installation medium that can be used to repair the system files that may have become corrupt and causing the system failure. One way to use this method is to boot the computer or laptop from the installation medium and follow the steps provided to fix the issue. Another approach is to use Safe Mode to access the system and install update(s) or uninstall the problematic software that is causing the issue.
It’s important to note that using the Windows 10 Media Creation Tool has its limitations and may not work in all cases. In some cases, users may need to try different methods or fixes to resolve the problem. For instance, users can try logging in using their Microsoft account instead of a local account or restarting the system by pressing the power button.
Another way to fix the problem is to check for Windows Updates or disable the Notifications of the startup software and peripherals. This can help to avoid the loading screen from getting stuck on the “Just a Moment” wait screen. Users may also try to use the SCCM or unattend xml to fix the boot and install stuck issues.
Using Registry Editor and Command Prompt for Windows 10 Fixes
- Using Registry Editor and Command Prompt for Windows 10 Fixes
- Resetting the Windows Update Components using Command Prompt
- Performing a System File Check using Command Prompt
- Using Registry Editor to modify the WaitToKillServiceTimeout value
- Using Registry Editor to modify the HungAppTimeout value
- Modifying the Registry to disable unnecessary startup programs
- Using Command Prompt to clear the Windows Store Cache
- Using Command Prompt to repair the Windows Store App
- Disabling unnecessary services using the Services.msc tool
- Using Command Prompt to check and repair disk errors
Performing a Clean Install of Windows 10
To fix this, users can use an installation medium such as a USB drive or DVD to perform a clean install of Windows 10. This method requires backing up files and software beforehand, as it will erase the entire system and reinstall a fresh copy of Windows 10.
Another approach is to use the Windows 10 Media Creation Tool to create an installation medium and use it to install update(s) to the system. Users can also try booting their device in Safe Mode or using System Notifications to identify the issue causing the system failure.
If the device is functional but experiencing loading screen or moment stuck behavior, users can try logging in with a different Microsoft account or checking for any pending Windows updates. Additionally, disabling any unnecessary startup software or peripherals like Bluetooth may help.
Restoring Windows 10 with System Restore
System Restore is a method that restores the system files and settings to a previous point in time, which can help to fix the issue. It is a way to undo recent changes that may have caused the problem.
Before starting the process, you should try some quick fixes, such as restarting the computer, checking for updates, disconnecting peripherals, and logging in with a different account. If these approaches don’t work, you can use System Restore.
To restore your computer, you need to boot your PC in Safe Mode or use an installation medium, such as Windows 10 Media Creation Tool or an installation DVD. Once you are in the Safe Mode, go to the System Restore page and select a restore point that you want to use.
Keep in mind that System Restore has some limitations, such as not being able to fix issues caused by hardware or software that wasn’t installed correctly or files that are corrupts.
In this article, we have provided you with the steps to restore your Windows 10 with System Restore. Try this approach to fix the moment stuck issue on your computer or laptop.
Running SFC Scan to Fix Windows 10 Issues
Running an SFC scan is a way to fix various issues on your Windows 10 computer. The SFC scan (System File Checker) is a built-in feature that scans and restores any corrupt or missing system files.
To perform the scan, users need to open the Command Prompt as an administrator, type in “sfc /scannow,” and hit enter. Wait for the scan to complete, and if it finds any errors, it will attempt to fix them.
If the SFC scan doesn’t fix the issue, try running it in Safe Mode or using an installation medium like a USB drive with the Windows 10 Media Creation Tool. Another approach is to install any available updates or use specialized fixes for specific problems.
It’s important to note that the SFC scan has its limitations, and it won’t always fix every software or system failure. In some cases, a full system restore or reinstall may be necessary.
Hard Resetting Windows 10 for a Fresh Start
If you’re experiencing issues with your Windows 10 computer, a hard reset might be the solution you need. This powerful feature can help fix a variety of problems, including system failures, loop screens, and corrupt system files.
However, it’s important to note that a hard reset will delete all of your data and reinstall the operating system. So, before proceeding with this method, make sure you have a backup of all important files and documents.
One way to perform a hard reset is to use the Windows 10 Media Creation Tool to create an installation medium. This tool can be used to repair your computer’s startup software, fix system notifications, and install updates. Another approach is to boot your computer in Safe Mode, where you can troubleshoot issues without starting up all of your peripherals and functionalities.
If these methods don’t work, you can try logging in with a different account or using an unattend xml file to automate the installation process. In some cases, the problem might be related to Bluetooth or other peripherals, so you can try disconnecting them and then restarting your computer.
No matter which method you choose, remember to restart your computer by pressing the power button to see if the behavior has changed. With these solutions and approaches, you can fix the “Just a Moment” or blue screen stuck issue and get your computer back up and running in no time.