Are you experiencing issues with your hard drive on Windows 10? If so, you can fix the problem by following these 100% active solutions.
Disable SuperFetch Service
To disable the SuperFetch service on Windows 10, follow these steps:
1. Open the Run dialog by pressing the Windows key + R and type services.msc then hit Enter.
2. In the Services window, locate SuperFetch in the list of services.
3. Right-click on SuperFetch and select Properties.
4. In the Properties window, go to the General tab and change the Startup type to Disabled.
5. Click Apply and then OK to save the changes.
6. Restart your computer to apply the changes.
Disabling the SuperFetch service can help resolve issues related to 100% active hard drive usage on Windows 10.
Update Windows and Device Drivers
To ensure your hard drive is running at 100% efficiency on Windows 10, it’s important to update both Windows and device drivers regularly. Outdated drivers can cause performance issues and even lead to system crashes. To update Windows, simply click on the Start menu and type “Windows Update” in the search bar. Then, select “Check for updates” and follow the on-screen instructions to install any available updates.
In addition to updating Windows, it’s crucial to keep device drivers up to date as well. Outdated drivers can cause compatibility issues and impact the overall performance of your hard drive. To update your device drivers, open the Device Manager by pressing the Windows key + X and selecting “Device Manager” from the menu. Then, right-click on the device you want to update and select “Update driver.” Follow the on-screen instructions to complete the update process.
Regularly updating both Windows and device drivers can help ensure that your hard drive is running at its best. By keeping your system up to date, you can minimize the risk of encountering performance issues and enjoy a smooth computing experience.
Perform System and Disk Checks
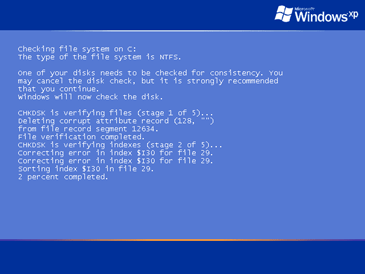
| Check | Description |
|---|---|
| Check Disk (CHKDSK) | Scans the file system and hard drive for errors and fixes them |
| SFC scan | System File Checker scans and repairs corrupted system files |
| Defragment and Optimize Drives | Reorganizes fragmented data on the hard drive for improved performance |
| Check for malware | Run a full system scan using antivirus software to check for malware |
Reset or Manage Virtual Memory
To manage virtual memory in Windows 10, you can reset the virtual memory settings to their default values. This can help resolve issues with 100% active hard drive usage.
To reset virtual memory in Windows 10, follow these steps:
1. First, open the Control Panel and navigate to System and Security > System > Advanced system settings.
2. In the System Properties window, go to the Advanced tab and click on the Settings button under the Performance section.
3. In the Performance Options window, go to the Advanced tab and click on the Change button under the Virtual memory section.
4. Uncheck the “Automatically manage paging file size for all drives” option.
5. Select the drive that contains your Windows installation (usually the C: drive) and choose “Custom size.”
6. Set the initial size and maximum size to the recommended values. You can find the recommended values under the “Total paging file size for all drives” section in the same window.
7. Click on Set and then OK to apply the changes.
By resetting the virtual memory settings, you can potentially fix issues related to 100% active hard drive usage in Windows 10. Remember to restart your computer after making these changes for them to take effect.
It’s important to note that managing virtual memory can have a significant impact on your system’s performance, so it’s best to follow these steps carefully. If you’re still experiencing issues after resetting virtual memory, consider seeking further technical support or consulting with a professional.
Address Malware and Antivirus Software
When dealing with a 100% active hard drive issue in Windows 10, it’s important to address the possibility of malware affecting your system. Conduct a thorough scan of your computer using reliable antivirus software to detect and remove any potential threats.
Open your antivirus software and initiate a full system scan to ensure that no malware is causing the excessive hard drive activity. If any threats are detected, follow the prompts to quarantine or remove them from your system.
In addition to malware, outdated or incompatible antivirus software can also contribute to excessive hard drive activity. Make sure that your antivirus software is up to date and compatible with Windows 10 to avoid any performance issues.
It’s also worth considering the impact of Windows updates on your hard drive activity. Windows Update can sometimes cause increased disk usage as it downloads and installs updates in the background. Keep an eye on the Windows Update process in the Task Manager and allow it to complete any pending updates before assessing the hard drive activity.
If the issue persists, consider performing a clean boot of your system to identify any third-party applications that may be causing the problem. Open the System Configuration tool by typing “msconfig” into the Windows Search bar and navigate to the Services tab. Check the box for “Hide all Microsoft services” and then click “Disable all.” Restart your computer and observe the hard drive activity to see if it has improved.
In some cases, a faulty device driver or software bug can lead to excessive hard drive activity. Check for any available driver updates and install them to ensure that your hardware is functioning properly. Additionally, keep an eye out for any software updates that may address performance issues related to hard drive activity.
If you’re still experiencing 100% active hard drive usage after addressing malware and antivirus software, consider seeking technical support from Microsoft or a trusted third-party service. They can provide further assistance in diagnosing and resolving the issue.
By addressing potential malware, ensuring the compatibility of antivirus software, monitoring Windows updates, performing a clean boot, updating device drivers, and seeking technical support if needed, you can effectively tackle the 100% active hard drive issue in Windows 10.
Reduce Background and Startup Applications
- Open Task Manager by pressing Ctrl+Shift+Esc
- Click on the Startup tab at the top of the Task Manager window
- Disable any unnecessary programs from starting up with your computer by right-clicking on them and selecting Disable
- Close the Task Manager window and restart your computer to apply the changes
Optimize or Rebuild Search Indexing
1. Open the Task Manager by pressing Ctrl + Shift + Esc on your keyboard.
2. Look for any processes that may be consuming a large amount of CPU time or memory. If you suspect a virus or malware, run a full scan of your system using a reputable antivirus software.
3. If you suspect a software bug or malfunction, check for any available patches or updates for your operating system. You can do this by going to the Start menu, clicking on Settings, then Update & Security, and finally Windows Update.
4. Consider backing up your important data before proceeding with any major changes, such as rebuilding the search index.
5. To rebuild the search index, open the Control Panel and navigate to Indexing Options. Click on the Advanced button, then select the Rebuild option.
6. If you are experiencing issues with your hard drive, consider running a diagnostic tool to check for any hardware problems. You can also try rebooting your computer to see if that resolves the issue.
7. If you are using external storage devices such as OneDrive, Dropbox, or an external hard drive, make sure that they are properly synchronized and that there are no issues with the device drivers.
8. After rebuilding the search index, monitor your system for any improvements in search functionality. If the issue persists, consider seeking further assistance from a trusted IT professional or support service.
Clean Up Junk and Temporary Files
First, open the Disk Cleanup utility by pressing the Windows key and typing “Disk Cleanup” in the search bar. Then, select the drive you want to clean up and click “OK.”
Once the utility has scanned your drive, it will present you with a list of files that can be safely deleted. Select the files you want to remove, and then click “OK” to start the cleanup process.
It’s also a good idea to clear your temporary files. To do this, press the Windows key and type “%temp%” in the search bar. This will open the Temp folder, where you can select all the files and folders and delete them.
In addition to cleaning up junk and temporary files, you can also use the Task Manager to identify any processes that may be causing the 100% active hard drive issue. Press Ctrl + Shift + Esc to open the Task Manager, then click on the “Processes” tab to see which processes are using the most disk resources.
If you identify any processes that are using a large amount of disk resources, you can try ending those processes to see if it reduces the disk activity. To end a process, simply right-click on it and select “End task.”
By cleaning up junk and temporary files, as well as identifying and ending resource-intensive processes, you can fix the 100% active hard drive issue in Windows 10 and improve the performance of your computer.
Adjust Power Settings and Energy Options
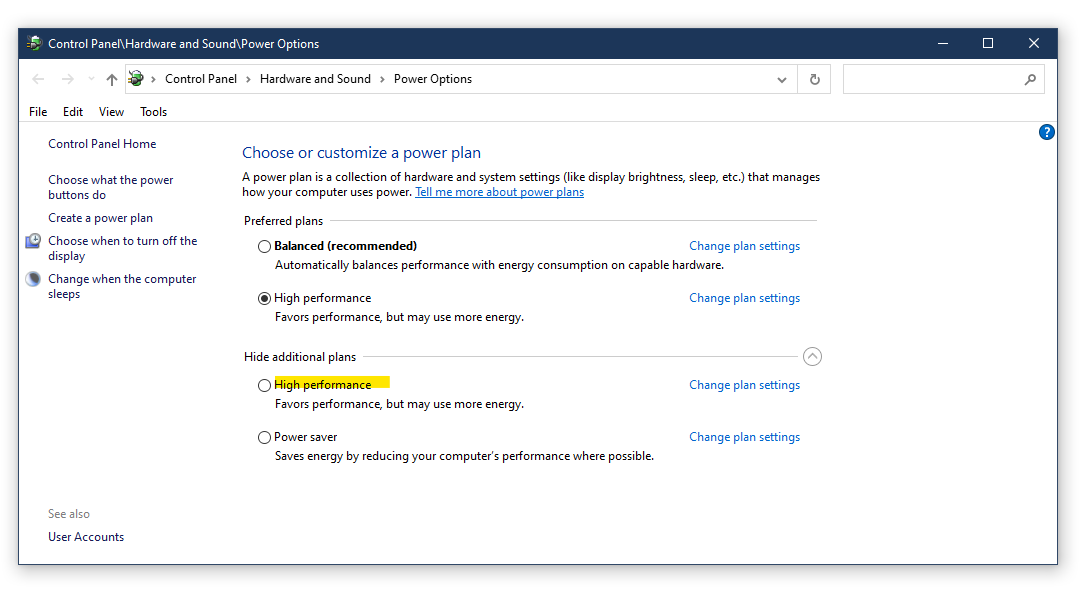
Once in the Control Panel, click on “Power Options.” Here, you can select a power plan that suits your needs, or you can customize a plan by clicking on “Change plan settings” next to the plan you want to adjust.
To further customize your power settings, click on “Change advanced power settings.” This will open a new window where you can modify various power options such as display, sleep, and USB settings.
In addition to adjusting power settings, you can also manage energy options to optimize your hard drive’s performance. To do this, go to the Control Panel and click on “Hardware and Sound,” then “Power Options.”
From the Power Options window, click on “Change plan settings” next to the selected power plan, and then click on “Change advanced power settings.”
In the advanced power settings window, expand the “Hard disk” option and set the “Turn off hard disk after” value to a higher number of minutes. This will prevent the hard drive from entering sleep mode too quickly, which can cause it to become inactive.
Troubleshoot with Clean Boot and Firmware Updates
To troubleshoot your 100% active hard drive issue on Windows 10, you can start by performing a Clean Boot. This will help you identify if a third-party application is causing the high disk usage. To do this, open the System Configuration tool by typing “msconfig” in the Windows Search bar and pressing Enter. In the System Configuration window, navigate to the Services tab and check the box that says “Hide all Microsoft services.” Then, click on “Disable all” and click “Apply.”
After performing a Clean Boot, you can check if the high disk usage issue persists. If it does not, you can start enabling the third-party services one by one to identify which one is causing the problem.
Another step you can take to fix the 100% active hard drive issue is to update your firmware. Firmware updates can fix bugs and improve the performance of your hardware. To update your firmware, you will need to visit the website of your hardware manufacturer and look for the latest firmware update for your specific device. Follow the instructions provided on the manufacturer’s website to install the firmware update.
After performing these troubleshooting steps, you should see an improvement in the performance of your hard drive on Windows 10. If the issue persists, you may need to consider seeking further assistance from a professional or the manufacturer of your hardware.