Are you experiencing DNS server issues on your Windows 10 computer? This article will provide you with the steps to fix the problem and get your internet connection back on track.
Understanding DNS Server Failures
DNS server failures can occur due to various reasons, leading to issues with internet connectivity and website accessibility. When encountering DNS server failures on Windows 10, it is important to troubleshoot the issue to restore normal functionality.
One common cause of DNS server failures is a misconfigured or malfunctioning DNS server. This can result in the inability to resolve domain names to IP addresses, causing websites to become inaccessible. Another potential cause is network connectivity issues, such as a faulty network adapter or router.
To fix DNS server issues on Windows 10, start by flushing the DNS cache to clear any corrupt or outdated information that may be causing the problem. This can be done by opening the command prompt and entering the command: ipconfig /flushdns.
If flushing the DNS cache does not resolve the issue, consider changing the DNS server to a public DNS server such as Google’s public DNS (8.8.8.8 and 8.8.4.4). This can be done by accessing the network adapter settings and manually specifying the DNS server addresses.
Additionally, ensure that your network adapter drivers are up to date, as outdated drivers can also cause DNS server failures. Updating the drivers can be done through the Device Manager in the Windows 10 operating system.
By addressing these common causes of DNS server failures, you can effectively troubleshoot and fix DNS server issues on Windows 10, restoring normal internet connectivity and website accessibility.
Causes of “DNS Server Not Responding” Error
– One common cause of “DNS Server Not Responding” error is a problem with the DNS server itself. This can be due to maintenance, overload, or a cyberattack.
– Another cause could be an issue with the user’s internet connection, such as a power outage, Wi-Fi or modem problem, or network switch malfunction.
– The error may also be caused by a misconfigured DNS setting, either on the user’s device or on the server side.
– Additionally, outdated or corrupted network drivers, antivirus software, or even a faulty device can also lead to this error.
– To troubleshoot, check if the DNS server is functioning properly and if there are any cyberattack threats. Then, verify the internet connection and restart the modem or router if necessary. Double-check the DNS settings on the device and reset them if needed. Finally, update or reinstall network drivers, and run a scan with antivirus software to rule out any malware.
Restart Your Modem or Router
If restarting your modem or router doesn’t fix the problem, you can also try flushing the DNS cache on your Windows 10 device. To do this, open the Command Prompt as an administrator and type “ipconfig /flushdns” then press Enter. This will clear the DNS resolver cache and may resolve any lingering DNS server issues.
If you’re still experiencing DNS server issues after restarting your modem or router and flushing the DNS cache, it may be worth contacting your internet service provider for further assistance. They can help troubleshoot the issue and ensure that you have a stable internet connection.
Utilize a Different Web Browser
![]()
It’s also a good idea to clear the cache and cookies in the web browser you are using to see if that resolves the DNS server problem. Sometimes, an accumulation of cached data can interfere with the proper functioning of the browser and cause DNS issues.
If the problem persists, you can also try restarting your computer in safe mode to see if the DNS server issue is related to any third-party software or drivers that may be causing interference. Restarting in safe mode can help narrow down the potential causes of the problem.
By utilizing a different web browser and following these troubleshooting steps, you can potentially resolve DNS server issues on Windows 10 and regain proper internet access.
Connect Using an Alternate Device

If the alternate device can connect to the internet without any issues, then the problem may be isolated to your Windows 10 device.
If the alternate device also experiences DNS server issues, it may be related to your network or ISP.
Consider restarting your router or modem to see if that resolves the DNS server problem.
If the issue persists, you may need to contact your ISP for further troubleshooting or consider using a different DNS server such as Google’s public DNS (8.8.8.8 and 8.8.4.4) or Cloudflare’s DNS (1.1.1.1).
Boot in Safe Mode
In Safe Mode, you can troubleshoot DNS server issues without interference from third-party software or drivers. This can help isolate the problem and determine if it’s related to your operating system or a specific application.
Once in Safe Mode, you can try flushing the DNS cache, renewing your IP address, or resetting your network settings. You can also try using a different web browser to see if the issue is specific to one browser.
If you’re still experiencing DNS server issues in Safe Mode, it may be necessary to seek further assistance from a professional or your internet service provider.
Update Network Adapter Drivers
If Windows is unable to find the updated driver, you can visit the manufacturer’s website to manually download and install the latest driver for your network adapter.
Once the driver is updated, restart your computer to apply the changes. This should help resolve any DNS server issues you are experiencing on Windows 10.
Temporarily Disable Antivirus and Firewall
To fix DNS Server Windows 10 issues, you may need to temporarily disable your antivirus and firewall. These security measures can sometimes interfere with your network connection and cause DNS issues.
To disable your antivirus, look for its icon in the system tray and right-click on it. Then, select the option to disable the antivirus software temporarily.
For the firewall, go to the Control Panel and select “System and Security.” From there, click on “Windows Defender Firewall” and then select “Turn Windows Defender Firewall on or off.” Here, you can turn off the firewall temporarily.
Once you’ve disabled these security measures, check to see if the DNS Server Windows 10 issues have been resolved. If they have, you may need to adjust the settings in your antivirus and firewall to allow the necessary connections for your DNS server to function properly.
Deactivate Secondary Connections and Peer-to-Peer Feature
Right-click on the network connection you want to deactivate and select “Properties”. Then, uncheck the “File and Printer Sharing for Microsoft Networks” and “Client for Microsoft Networks” options.
To disable the peer-to-peer feature, go back to the Settings app and click on “Update & Security”. Then, select “Windows Update” and click on “Advanced options”. Under “Choose how updates are delivered”, toggle the switch to turn off “Updates from more than one place”.
Flush DNS Cache and Reset IP
- Open Command Prompt as an administrator by typing “cmd” in the Windows search bar, then right-clicking on “Command Prompt” and selecting “Run as administrator.”
- Type the command “ipconfig /flushdns” and press Enter to flush the DNS cache.
- Close the Command Prompt and restart your computer to apply the changes.
Reset IP
- Open Command Prompt as an administrator by typing “cmd” in the Windows search bar, then right-clicking on “Command Prompt” and selecting “Run as administrator.”
- Type the command “ipconfig /release” and press Enter to release the current IP address.
- Type the command “ipconfig /renew” and press Enter to obtain a new IP address from the DHCP server.
- Close the Command Prompt and restart your computer to apply the changes.
Disable IPv6 on Your System
To disable IPv6 on your Windows 10 system, follow these steps:
1. Open the Control Panel and go to Network and Sharing Center.
2. Click on your network connection, then select Properties.
3. Uncheck the box next to Internet Protocol Version 6 (TCP/IPv6).
4. Click OK to save the changes.
If you continue to experience DNS server issues after disabling IPv6, you may need to consider other troubleshooting steps such as checking for updates, resetting your network settings, or contacting your ISP for assistance.
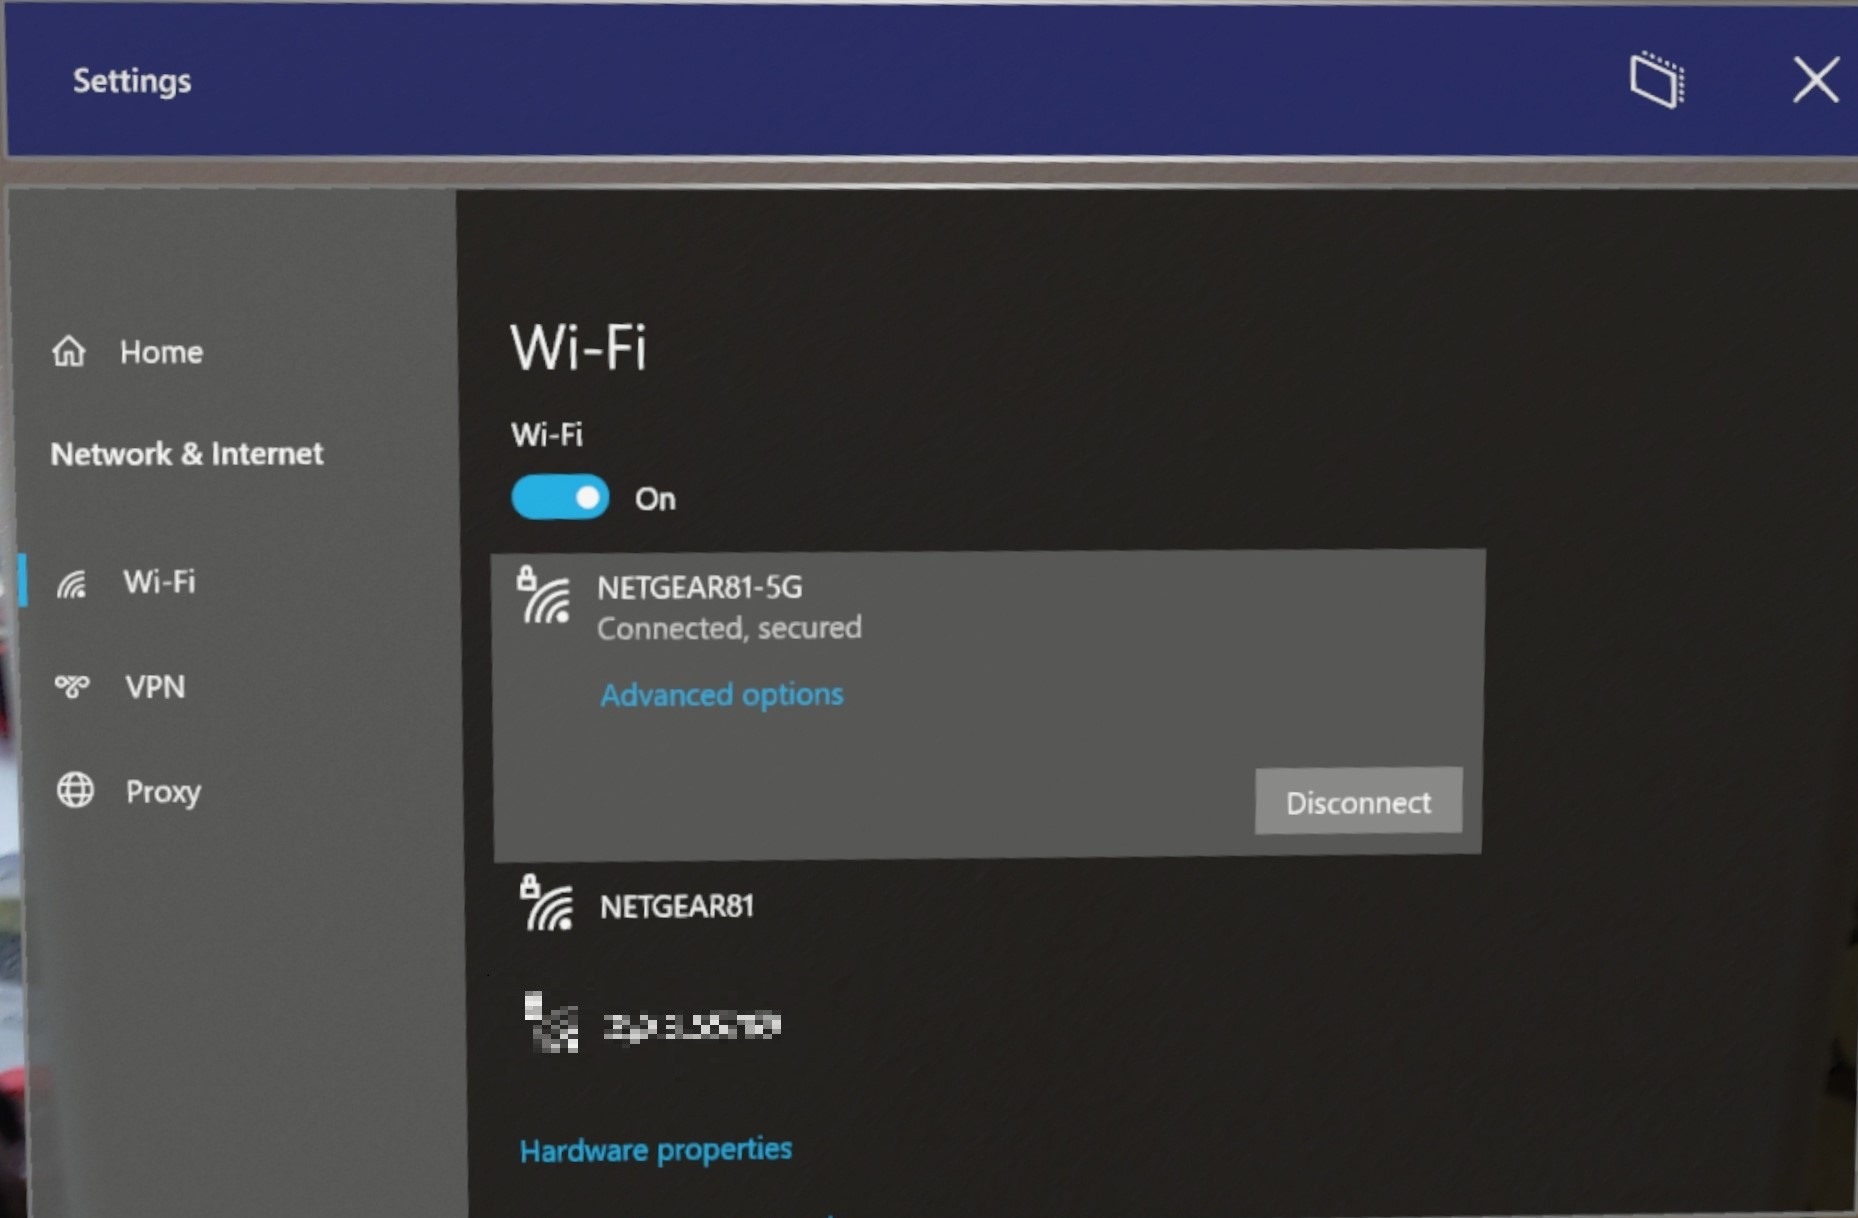
Manually Configure DNS Server Address
To manually configure the DNS server address on Windows 10, you can follow these steps. First, open the Control Panel and navigate to “Network and Sharing Center.” Then, click on “Change adapter settings” and right-click on your network connection. Select “Properties” and then double-click on “Internet Protocol Version 4 (TCP/IPv4).” Here, select the option to “Use the following DNS server addresses” and enter the preferred and alternate DNS server addresses. Make sure to click “OK” to save the changes.
After manually configuring the DNS server address, you may need to flush the DNS cache to ensure the changes take effect. To do this, open the Command Prompt as an administrator and type “ipconfig /flushdns” and press Enter. This will clear the DNS resolver cache and allow the new DNS server addresses to be used.
If you’re still experiencing DNS server issues after manually configuring the DNS server address, you may want to consider restarting your computer or router to ensure that the changes are fully applied. Additionally, you can check for any error messages or troubleshoot any connectivity issues to ensure that your internet access is functioning properly.
Reset Network Protocols and Enter MAC Address
To fix DNS server issues on Windows 10, reset network protocols and enter the MAC address of your device. First, open the Command Prompt as an administrator. Then, type “ipconfig /flushdns” and press Enter to clear the DNS resolver cache. Next, type “netsh int ip reset” and press Enter to reset TCP/IP. After that, type “netsh winsock reset” and press Enter to reset the Winsock catalog.
Once you’ve reset the network protocols, you’ll need to enter the MAC address of your device. To do this, open the Command Prompt and type “ipconfig /all” and press Enter. Look for the “Physical Address” under the network adapter you’re using – this is your MAC address. Take note of this address and use it as needed to fix your DNS server issues on Windows 10.
These steps should help resolve any DNS server issues you may be experiencing on your Windows 10 device.