Stop Code Memory Management Mining Solution is a comprehensive approach to addressing the challenges posed by memory management mining.
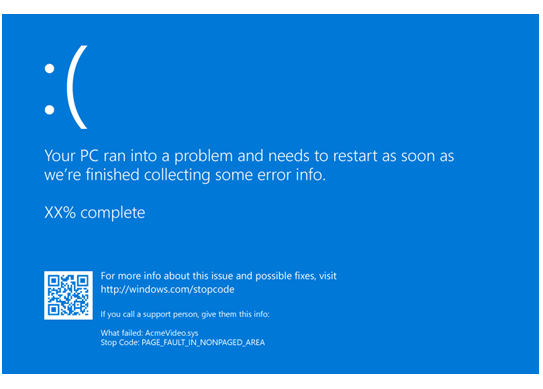
Causes of BSoD Errors
1. Faulty Device Drivers: Outdated or incompatible device drivers can cause BSoD errors. Update drivers using the manufacturer’s website or Device Manager.
2. Hardware Issues: Faulty hardware components like RAM, hard drives, or graphics cards can trigger BSoD errors. Test hardware using diagnostic tools or seek professional help.
3. Memory Problems: Issues with Random-Access Memory (RAM) can lead to BSoD errors. Use the Windows Memory Diagnostic tool to check for memory problems.
4. Overheating: Excessive heat can cause BSoD errors. Clean the computer’s cooling system, ensure proper ventilation, and use a cooling pad if necessary.
5. Software Conflicts: Conflicting or incompatible software can trigger BSoD errors. Uninstall recently installed programs or use Safe Mode to troubleshoot.
6. Malware Infection: Viruses or malware can corrupt system files, leading to BSoD errors. Run a full scan with reliable antivirus software like Microsoft Defender Antivirus.
7. Operating System Issues: Corrupted system files or improper Windows updates can cause BSoD errors. Use Windows Update to install the latest updates and run the SFC (System File Checker) tool to fix corrupted files.
Rebooting Your PC
1. Save all your work and close any open programs.
2. Click on the Start button in the bottom left corner of your taskbar.
3. Select the Power option from the menu that appears.
4. Click on Restart to initiate the reboot.
Rebooting your PC can help resolve various software-related issues, including the Stop Code Memory Management error. It allows your computer’s operating system to start fresh, clearing any temporary files or memory errors that may be causing the problem.
By restarting your PC, you give it a chance to reload the necessary system files and drivers, which can help fix any glitches or conflicts that may have occurred. Additionally, a reboot can also help in applying any pending updates or patches to your computer’s software.
Remember to save your work before initiating the reboot, as any unsaved data may be lost during the process. Rebooting your PC is a simple and effective troubleshooting step that can often resolve common computer issues.
If the Stop Code Memory Management error persists after rebooting, it may be necessary to further investigate the issue or seek assistance from a professional.
Scanning for Malware and Viruses
1. Start by opening your antivirus software. If you’re using Microsoft Defender Antivirus, you can find it in the Windows Security app. Look for the shield icon in your taskbar and click on it to open the app.
2. Once the antivirus software is open, navigate to the “Scan” or “Scan Now” option. This will initiate a scan of your computer’s files and memory to detect any malware or viruses.
3. During the scan, the antivirus software will examine your computer’s files, including the operating system, applications, and any connected devices such as USB flash drives. It will also check the memory for any suspicious activities or processes.
4. If the antivirus software detects any malware or viruses, it will quarantine or remove them from your system. This helps prevent further infection or damage to your computer.
5. It’s important to keep your antivirus software and operating system up to date with the latest patches and updates. This ensures that you have the most recent protection against emerging threats.
6. In addition to regular scans, it’s a good practice to avoid downloading files or visiting websites that may pose a risk. Be cautious when opening email attachments or clicking on unfamiliar links.
By regularly scanning for malware and viruses, you can proactively protect your computer from potential threats and avoid issues like the dreaded Blue Screen of Death.
Updating Windows and Drivers
![]()
To update Windows, follow these steps:
1. Press the Windows key and type “Windows Update” in the search bar.
2. Select the “Windows Update Settings” option.
3. Click on “Check for updates” to scan for any available updates.
4. If updates are found, click on “Install now” to start the update process.
5. Restart your computer once the updates have been installed.
Updating drivers is equally important. Outdated drivers can cause compatibility issues and lead to system crashes. To update your drivers:
1. Press the Windows key and type “Device Manager” in the search bar.
2. Select the “Device Manager” option.
3. Expand the categories to find the specific device driver you want to update.
4. Right-click on the device and select “Update driver.”
5. Choose the option to automatically search for updated driver software.
6. Follow the on-screen instructions to complete the update process.
Note: It is recommended to visit the manufacturer’s website for your specific hardware device to download the latest driver updates.
Regularly updating Windows and drivers can help resolve memory management issues and improve overall system performance. It is also crucial to keep your computer protected with reliable antivirus software and perform routine maintenance tasks like disk cleanup and defragmentation.
Running Diagnostic Tools for Memory
- Windows Memory Diagnostic Tool: A built-in tool in Windows that tests the computer’s RAM for errors.
- MemTest86: A popular third-party tool used to thoroughly test the computer’s memory for any issues.
- Prime95: A stress testing tool that can help identify memory-related problems by putting the system under heavy load.
- Memtest86+: An advanced memory diagnostic tool that is capable of detecting errors in RAM modules.
- Windows Resource and Performance Monitor: A built-in tool in Windows that can help identify memory-related issues and monitor system performance.
- Windows Event Viewer: A tool that logs system events and errors, which can be useful in diagnosing memory-related issues.
- MemScope: A software tool specifically designed for testing memory modules in Dell computers.
- SIW (System Information for Windows): A comprehensive system information tool that can provide details about the computer’s memory and help identify any problems.
Repairing Disk and System Files
To repair disk and system files, follow these direct instructions:
1. Restart your computer and press the Windows key + X to open the Power User Menu.
2. Select “Command Prompt (Admin)” from the menu.
3. In the Command Prompt window, type sfc /scannow and press Enter.
4. The System File Checker tool will scan for and repair any corrupted or missing system files.
5. Once the scan is complete, restart your computer.
If the issue persists, you can also try repairing disk errors:
1. Connect a USB flash drive to your computer.
2. Press the Windows key + X and select “Command Prompt (Admin)” from the Power User Menu.
3. In the Command Prompt window, type chkdsk /f [drive letter] and press Enter.
Replace [drive letter] with the letter assigned to your USB flash drive (e.g., chkdsk /f D:).
4. The chkdsk utility will scan and repair any errors on the selected drive.
If you’re using Windows 10, you can also utilize the built-in “Memory Diagnostic” tool:
1. Press the Windows key + R to open the Run dialog box.
2. Type mdsched.exe and press Enter.
3. Select “Restart now and check for problems” to start the memory diagnostic.
4. Your computer will restart and perform a thorough memory test.
Managing Hardware and Software Compatibility

1. Check for hardware compatibility issues. Ensure that all hardware components, including the graphics card, hard disk drive, and memory modules, are compatible with your system. Consult the manufacturer’s documentation or their website for compatibility information.
2. Update firmware and device drivers. Outdated firmware and device drivers can cause compatibility issues. Visit the manufacturer’s website to download and install the latest firmware and drivers for your hardware components.
3. Verify software compatibility. Ensure that the software you are using, including the operating system (such as Windows 10) and any applications, are compatible with each other. Check the software’s system requirements or consult the software developer’s website for compatibility information.
4. Apply patches and updates. Regularly check for and install the latest patches and updates for your operating system and software. These updates often include bug fixes and compatibility improvements.
5. Troubleshoot conflicting software. If you experience compatibility issues after installing a new software or update, try uninstalling or disabling the recently installed software to see if the issue resolves.
6. Use diagnostic tools. Windows provides built-in diagnostic tools, such as the Event Viewer, to help identify hardware and software compatibility issues. Use these tools to gather more information about the problem and find potential solutions.
FAQs
How do I fix Memory Management stop code?
To fix the Memory Management stop code, you can try the following steps:
1. Reboot your Windows PC.
2. Perform a quick scan using Windows Security.
3. Update your Windows 11/10 operating system.
4. Update your drivers.
5. Update your GPU driver.
6. Run the Windows Memory Diagnostic tool.
7. Check for RAM issues using the free Memtest86+ tool.
8. Use the chkdsk command to verify and repair system files.
Which stop code indicates a memory error?
The stop code that indicates a memory error is the MEMORY_MANAGEMENT error, which may appear on your computer screen as the 0x0000001A code.