Having trouble changing your Windows 10 proxy settings? Let’s explore some possible solutions.
Utilizing Group Policy to Manage Settings
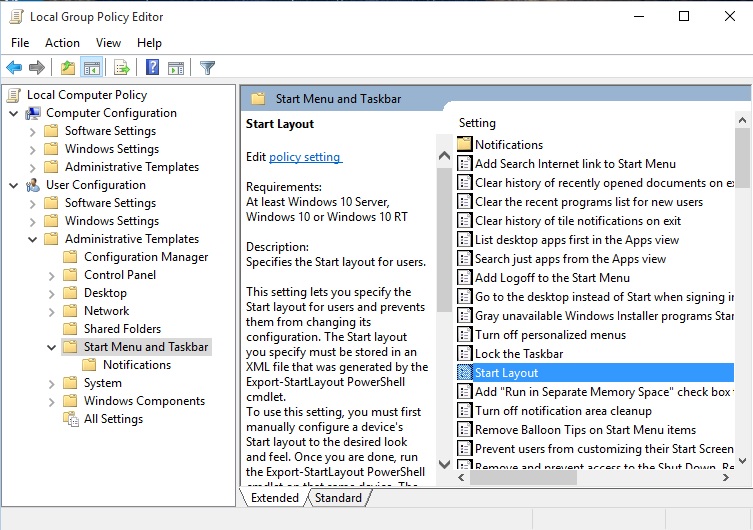
To utilize Group Policy to manage settings for Windows 10 Proxy Settings that cannot change, follow these steps:
1. Open the Group Policy Editor by pressing the Windows key + R, typing gpedit.msc, and pressing Enter.
2. In the Group Policy Editor, navigate to User Configuration > Internet Explorer Maintenance > Connection > Proxy Settings.
3. Double-click on Proxy Settings to open the properties.
4. Select the option to Enable proxy settings and enter the appropriate proxy information in the provided fields.
5. Click OK to save the changes.
6. Close the Group Policy Editor and restart the computer to apply the new proxy settings.
By utilizing Group Policy, you can effectively manage and enforce proxy settings for Windows 10 computers that cannot be changed through the traditional settings interface. This allows for centralized control and management of proxy settings across multiple computers in a network, ensuring that all users adhere to the specified proxy configuration.
Modifying the Registry to Adjust Settings
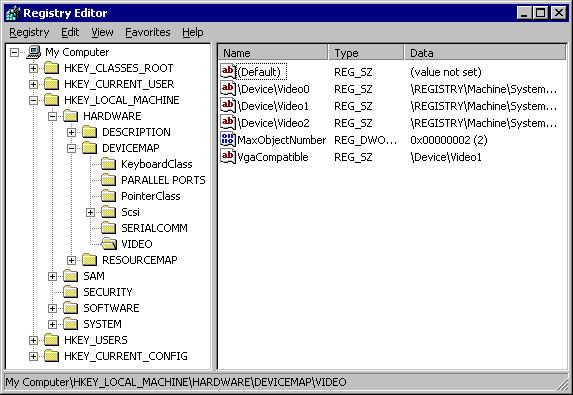
To modify the proxy settings in Windows 10 when unable to change them through the usual methods, you can adjust the Registry. This can be done by following these steps:
1. Press the Windows key + R to open the Run dialog box.
2. Type “regedit” and press Enter to open the Registry Editor.
3. Navigate to the following key: HKEY_CURRENT_USER\Software\Microsoft\Windows\CurrentVersion\Internet Settings.
4. Look for the ProxyEnable DWORD value on the right-hand pane. If it doesn’t exist, you can create it by right-clicking on an empty space and selecting New > DWORD (32-bit) Value.
5. Double-click on the ProxyEnable value and change the value data to 0 to disable the proxy or 1 to enable it.
6. Close the Registry Editor and restart your computer for the changes to take effect.
It’s important to note that modifying the Registry can have irreversible effects on your system if not done correctly. It’s recommended to back up your Registry or create a system restore point before making any changes.
Once you have adjusted the proxy settings through the Registry, you should be able to change them through the Control Panel or Settings app as you normally would. If you continue to experience issues with changing the proxy settings, it may be a good idea to check for any malware or third-party applications that could be interfering with the settings.
Troubleshooting Internet Connection Issues
- Open Settings by pressing Windows key + I.
- Click on Network & Internet.
- Choose Proxy from the left-hand menu.
- Ensure that the Use a proxy server toggle is turned off.
Reset Network Settings
- Open Command Prompt as an administrator by searching for CMD, right-clicking, and selecting Run as administrator.
- Type the command netsh winsock reset and press Enter.
- Restart your computer to apply the changes.
Run Network Troubleshooter
- Open Settings by pressing Windows key + I.
- Click on Update & Security.
- Choose Troubleshoot from the left-hand menu.
- Select Internet Connections and follow the prompts to run the troubleshooter.
Adjusting Network Properties and Proxy Detection
To adjust network properties and detect proxy settings in Windows 10, follow these steps:
1. First, open the Control Panel by searching for it in the Start menu.
2. In the Control Panel, click on Internet Options.
3. Go to the Connections tab and click on LAN settings.
4. Uncheck the box that says “Use a proxy server for your LAN” if it is checked.
5. Click OK to save the changes and close the windows.
If the proxy settings still cannot be changed, there may be some underlying issues with your network or system. It is recommended to check for any malware or viruses that may be affecting your network properties.
Additionally, ensure that your user account has the necessary permissions to make changes to the network settings. If you are unable to change the proxy settings, it may be due to restrictions set by your network administrator.
Furthermore, it is important to keep your Windows 10 system updated with the latest Microsoft updates, as these updates often include fixes for network-related issues.
If the issue persists, consider resetting your network settings by opening the Settings app, going to Network & Internet, and selecting Network reset to reset all network adapters to their default settings.
In some cases, using a virtual private network (VPN) can also affect the ability to change proxy settings. If you have a VPN configured on your system, try disabling it to see if that resolves the issue.
If you are still unable to change the proxy settings, it may be necessary to seek assistance from a professional IT technician or your network administrator to diagnose and resolve the issue.
Resetting Internet Options for Troubleshooting
| Step | Instructions |
|---|---|
| 1 | Open Internet Options |
| 2 | Go to the Advanced tab |
| 3 | Click on the Reset button |
| 4 | Check the box for “Delete personal settings” |
| 5 | Click on the Reset button |
| 6 | Restart your computer |